EVA experience web app – Network connection
Technical tablet requirements
The EVA Experience Controller can only be operated with a touchscreen tablet, not with a smartphone. We recommend a screen size of 9.7 inch to 11 inch for optimal functioning of the web environment.
The following tablet operating systems are generally suitable:
Android tablets with Android version 12 or higher.
Apple tablets with iOS 15.3 or higher.
Setting the PCB and WIFI

Before you want to connect to the home network or create a new network, the rotary switches must first be set correctly and the WIFI must be switched on.
1. Setting the Printed Circuit Board (PCB):
Go to the green Printed Circuit Board (EVA SP-ECA-PRO). This is located in the Motor Control Unit of the EVAstream or in a separate power supply box.
Set the Rotary switches at 000
2. Turn WIFI on for installation
On the green Printed Circuit Board, set the ENA WIFI button to ON by sliding switch 2 to the right.
The green Printed Circuit Board (EVA SP-ECA-PRO) is the master in all cases for control. The EVA LED underwater lighting and EVA Piezo can be linked to this if desired
Network connection
An internet connection is not required to operate the EVA Experience Controller with a tablet. However, the tablet must be connected to the same WiFi network as the controller. WiFi networks of 2.4 GHz are supported. There are 2 options for this:
1. New network (Access Point Mode)
Create a new WiFi network with the EVA Experience Controller, and connect the tablet to this network. This option is suitable if the home network does not provide sufficient coverage around the pool:
- Due to the EVA Experience Controller’s own network, it is not necessary to further expand the cover age of the home network.
- Your device is not connected to the internet.
2. Home network
Connect the tablet and the EVA Experience Controller to the home network. This option is preferred if the home network provides sufficient coverage around the pool:
- The tablet remains connected to the home network while operating the EVA Experience Controller.
- Switching networks on the tablet is not necessary to operate the controller.
New network (Access Point Mode)
Create a new WiFi network with the Printed Circuit Board (PCB) and connect the tablet to this network. This option is suitable if the home network does not provide sufficient coverage around the pool.
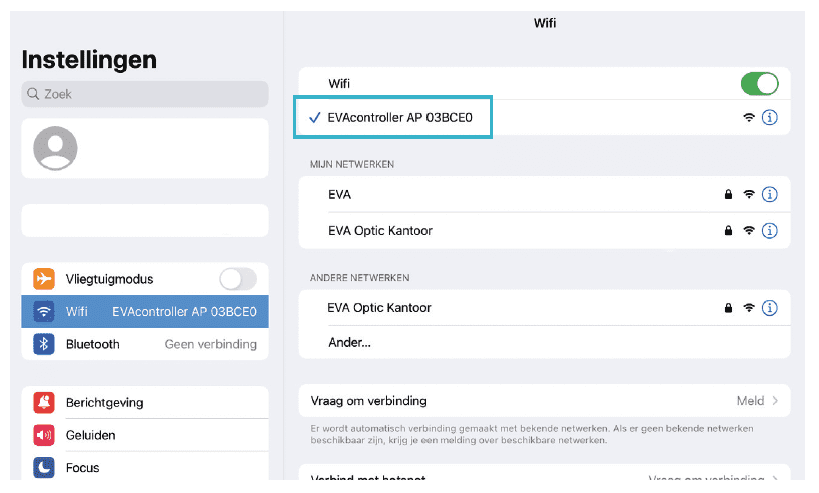
Step 1
Connect tablet to Printed Circuit Board (PCB):
Open the screen on the tablet with WiFi connections, and connect to the network.
EVAcontroller AP ###### (or via IP 192.168.4.1)
A screen with the EVA logo will automatically appear. Click on Continue under the logo.
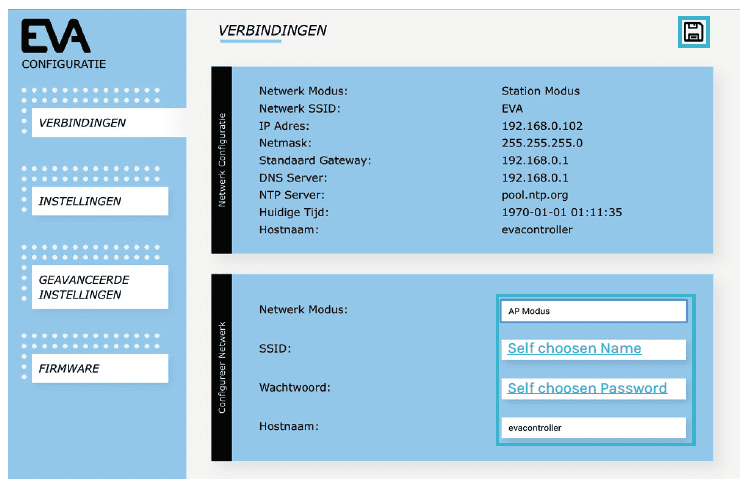
Step 2
Connect Printed Circuit Board (PCB) to new network:
- Select AP Mode next to Network Mode.
- Enter a self choosen Name for the new network next to Network SSID (only letters and numbers).
- Enter a self chossen Password next to Password. Minimum 8 characters!
- Check if evacontroller is filled in next to Hostname.
- The other settings usually do not need to be changed. Click the save icon at the top right.

Step 3
Disconnect the wifi connection on the Printed Circuit Board (PCB):
On the Printed Circuit Board (PCB), set the ENA WIFI button to OFF again (slide switch 2 back to the left). The PCB is now connected to the new network.
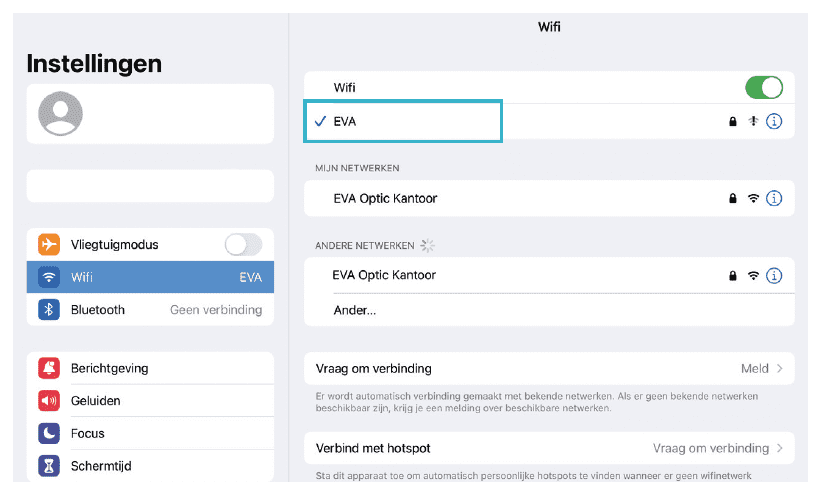
Step 4
Connect the tablet to home network:
Open the screen with WiFi connections on the tablet and connect to the new network.
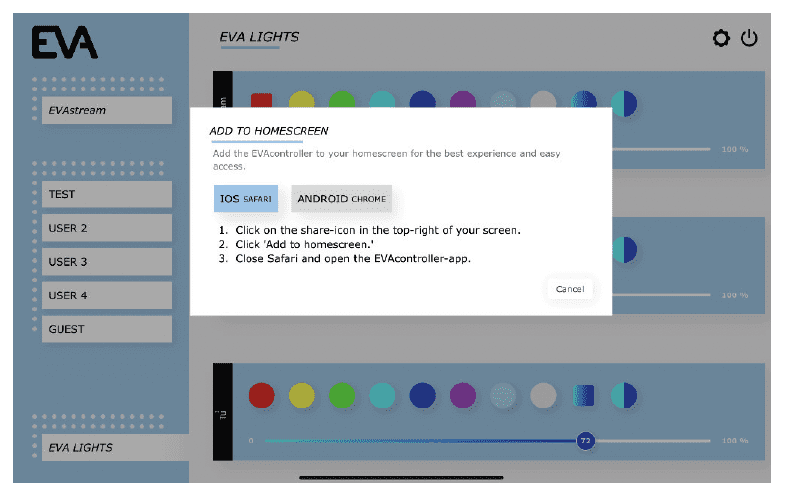
Step 5
Connect tablet to EVA Experience web app environment:
Go to your internet browser and enter the following address in the address bar:
http://evacontroller.local (or via IP 192.168.4.1)
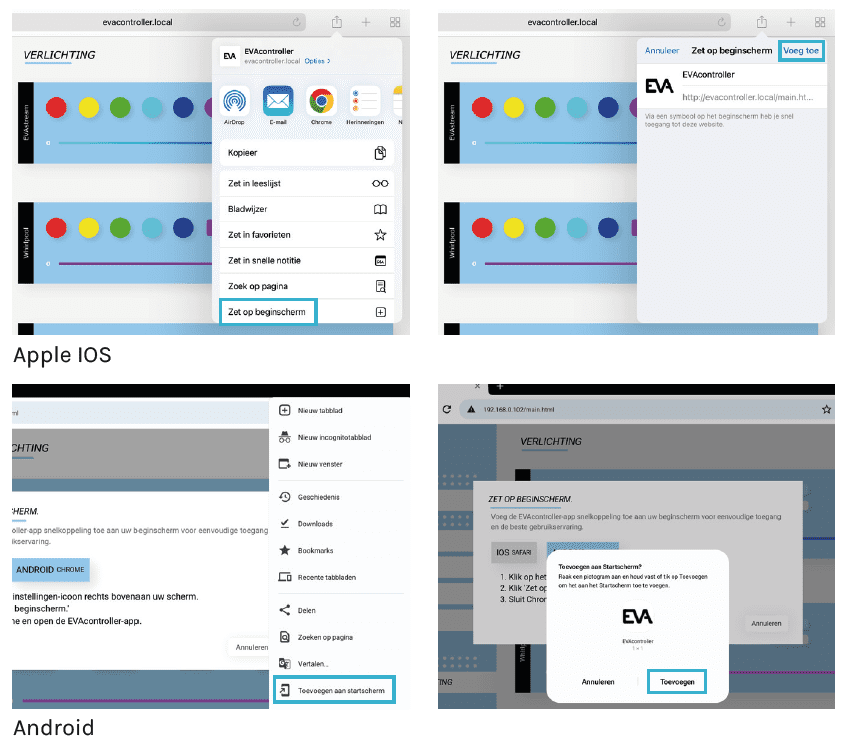
The pop-up provides instructions for creating an EVA shortcut icon on your tablet’s desktop (for easy access to the EVA Experience web app environment in the future).
1. Click on the share icon to the right of the address bar.
2. Select Add to Home Screen.
3. Name the icon EVAstream and select Add.
4. The icon is now added to your tablet’s desktop.
Home network
Connect the tablet and the Printed Circuit Board (PCB) to the home network. This option is preferred if the home network provides sufficient coverage around the pool.

Step 1
Connect tablet to Printed Circuit Board (PCB):
Open the screen on the tablet with WiFi connections, and connect to the network.
EVAcontroller AP ###### (or via IP 192.168.4.1)
A screen with the EVA logo will automatically appear. Click on Continue under the logo.
Step 2
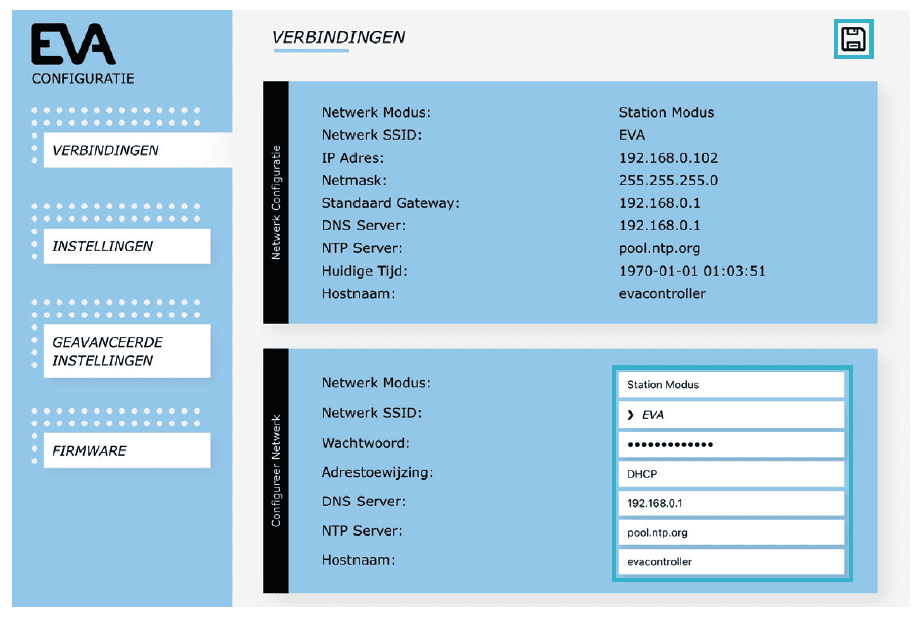
Connect Printed Circuit Board (PCB) to new network:
- Select Station Mode next to Network Mode.
- Choose your Home network next to Network SSID.
- Enter your Password next to Password.
- Check if evacontroller is filled in next to Hostname.
- The other settings usually do not need to be changed. Click the save icon at the top right.
Step 3
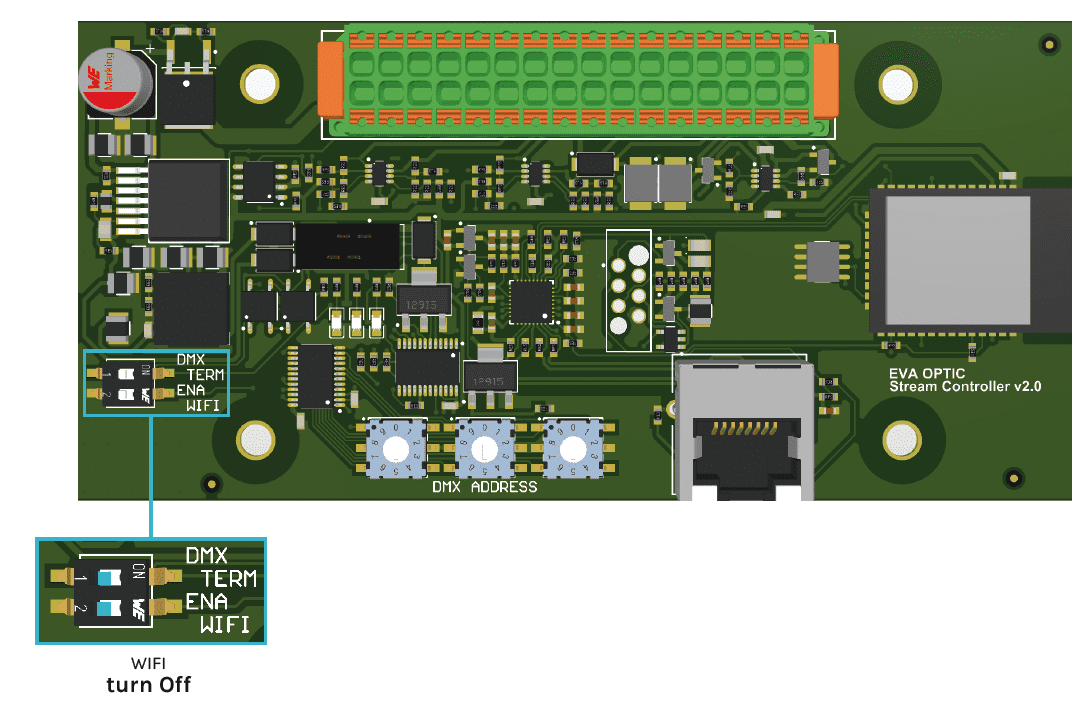
Disconnect the wifi connection on the Printed Circuit Board (PCB):
On the Printed Circuit Board (PCB), set the ENA WIFI button to OFF again (slide switch 2 back to the left). The PCB is now connected to the home network.

Step 4
Connect the tablet to home network:
Open the screen with WiFi connections on the tablet and connect to the home network.


Step 5
Connect tablet to EVA Experience web app environment:
Go to your internet browser and enter the following address in the address bar:
http://evacontroller.local
The pop-up provides instructions for creating an EVA shortcut icon on your tablet’s desktop (for easy access to the EVA Experience web app environment in the future).
1. Click on the share icon to the right of the address bar.
2. Select Add to Home Screen.
3. Name the icon EVAstream and select Add.
4. The icon is now added to your tablet’s desktop.
Settings for first use
Before using the EVA Experience web app environment for the first time, it is advisable to enter a number of settings.
Step 1
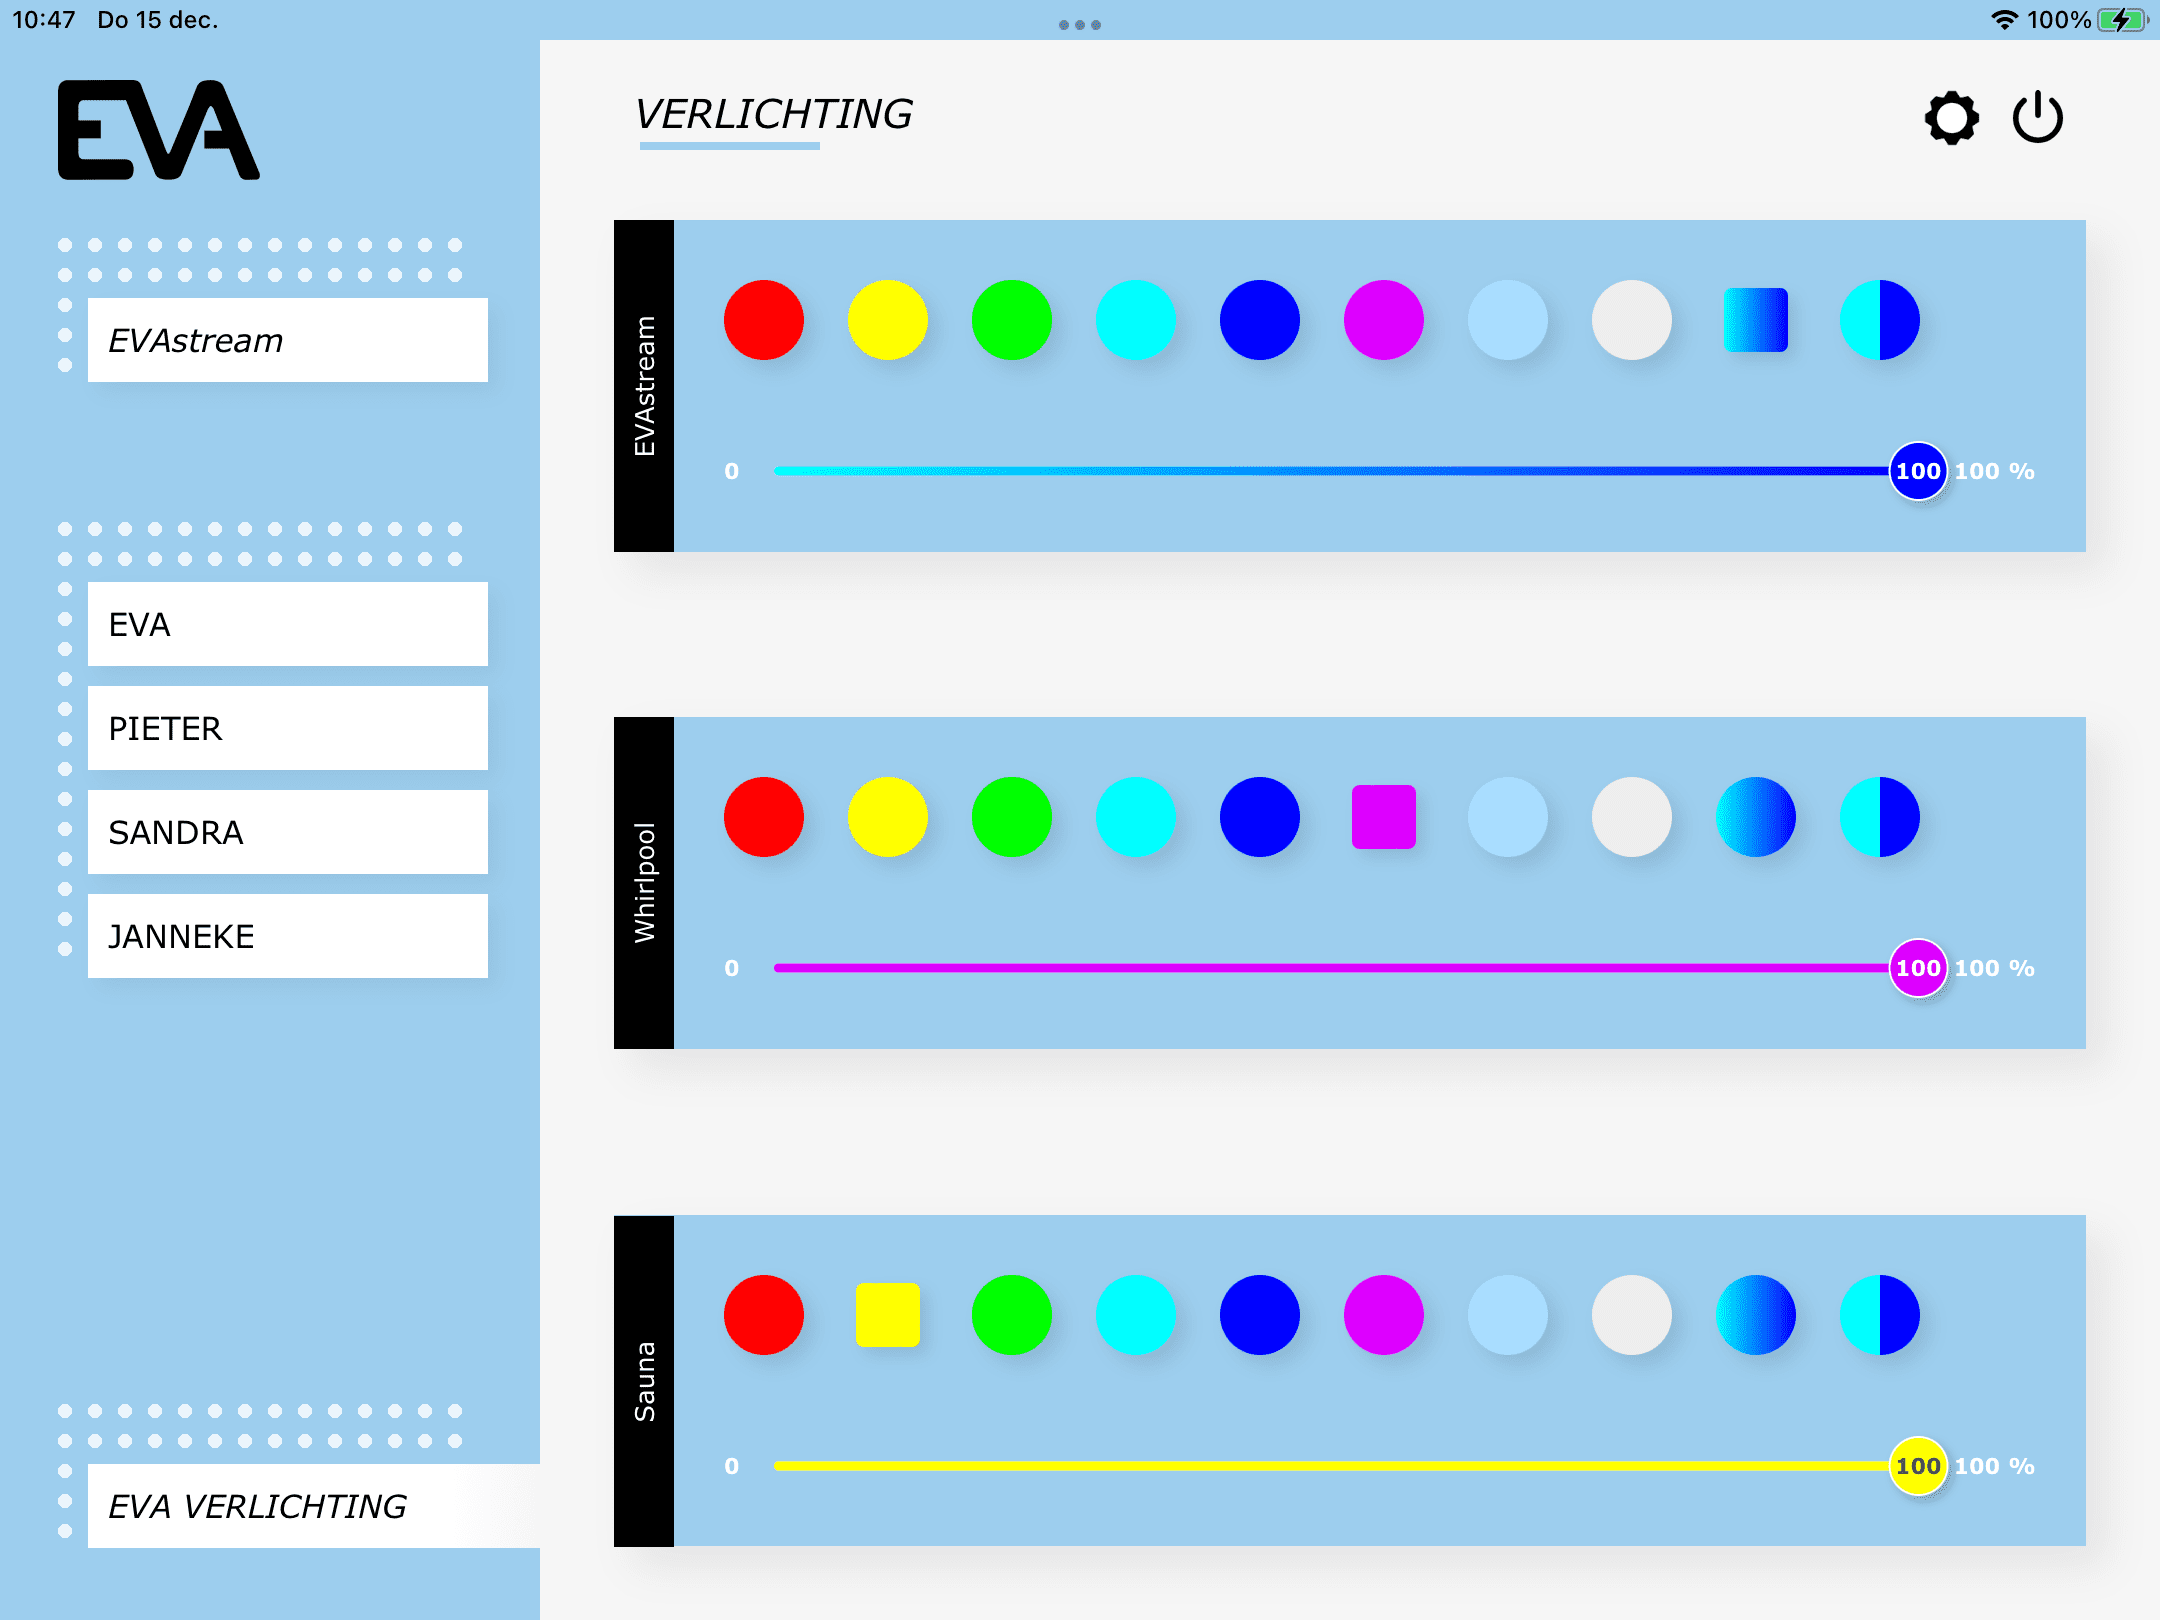
Click on the EVA app icon you created in the previous step, or go to your internet browser and enter the following address in the address bar:
http://evacontroller.local
You will now see the home page of the EVA Experience web app environment.
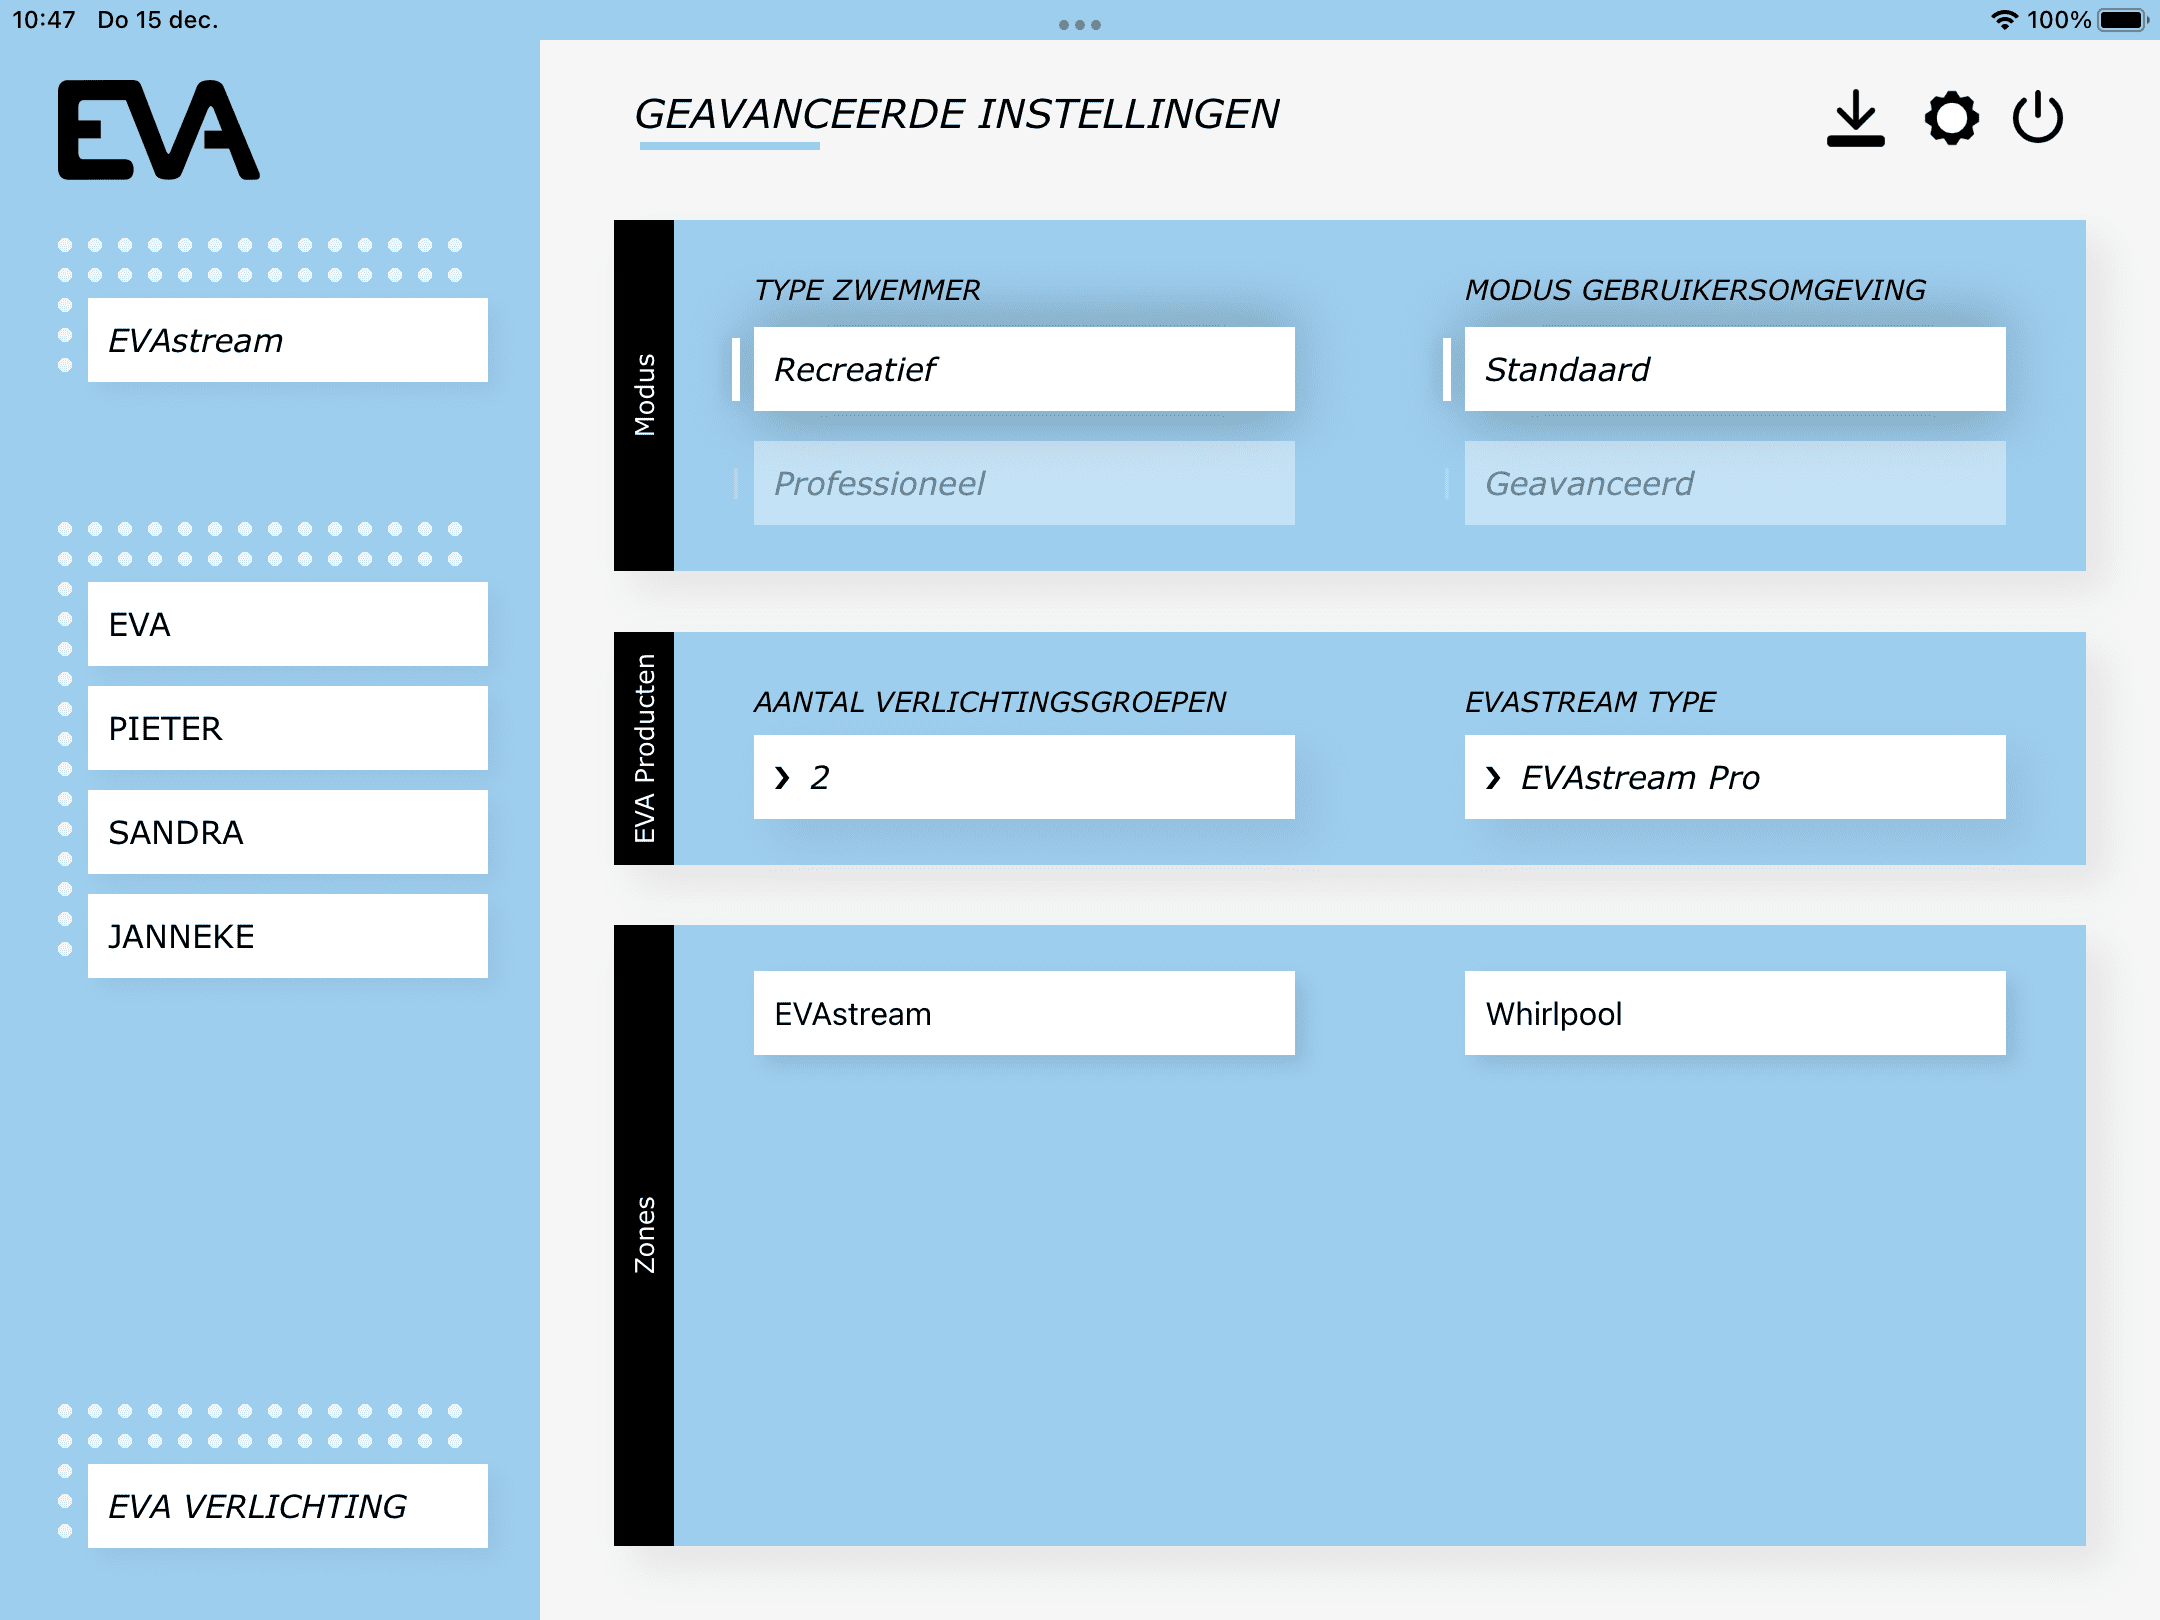
Step 2
Click twice on the gear icon at the top right of the screen to go to the advanced settings for linked EVA products.
- Select number of groups at lighting groups and give recognizable names al Zones (block below). Only enter multiple zones when there are several light groups such as EVAstream Lamps, Jacuzzi Lamps, etc. NB! The first group is always the lighting group linked to the EVAstream. The lighting in this group automatically changes color during training.
- Select the correct EVAstream type at EVAstream type.
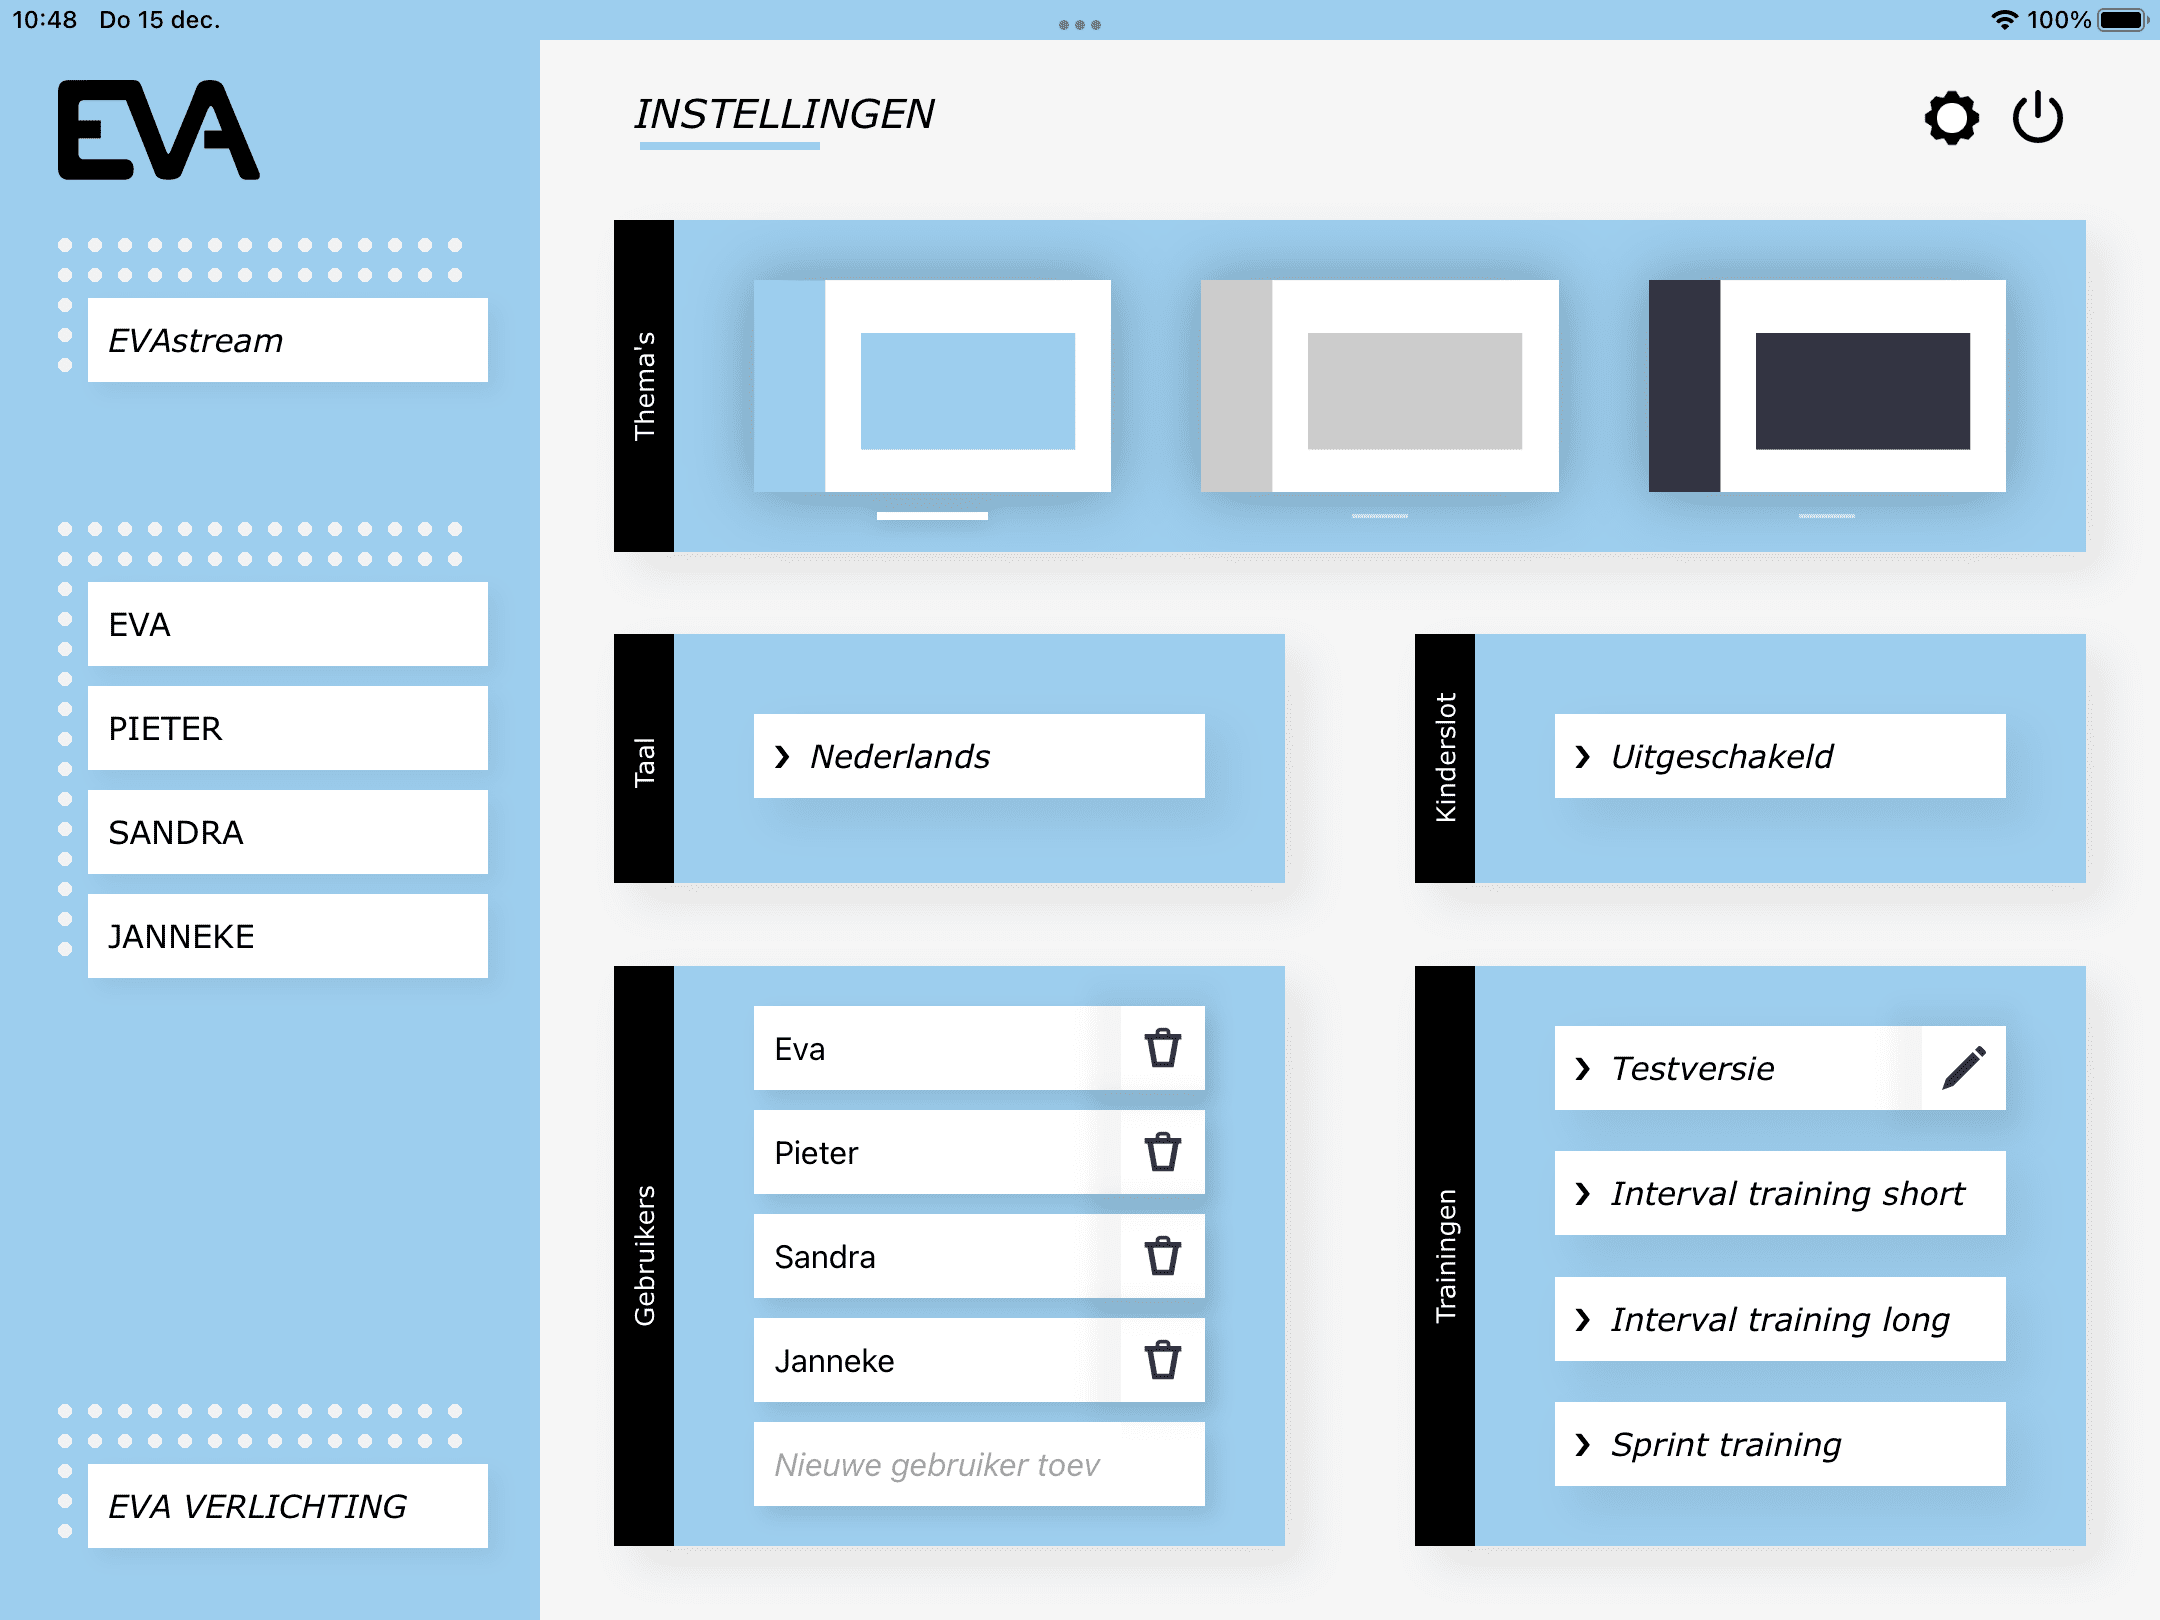
Step 3
Click once on the gear icon at the top right of the screen to go to the basic settings.
On this page you can select the color scheme of the web environment, set your language, set a child lock, create users and link EVAstream training courses to the users:
Setting parental control Select
- Select Enabled at parental control.
- Enter first the Mastercode 6738 and after that an own choosen code (4 digits). From now on you can use both codes (master code and your own code). If you forget your own code, you can always use the master code to create a new own code. When the child lock is enabled, you will be asked to enter the code at various times, before use of the EVAstream.
Set users
- Select Add New User and enter the name of the user followed by Enter.
- Add workouts to the user by selecting them in the right menu Programs.


