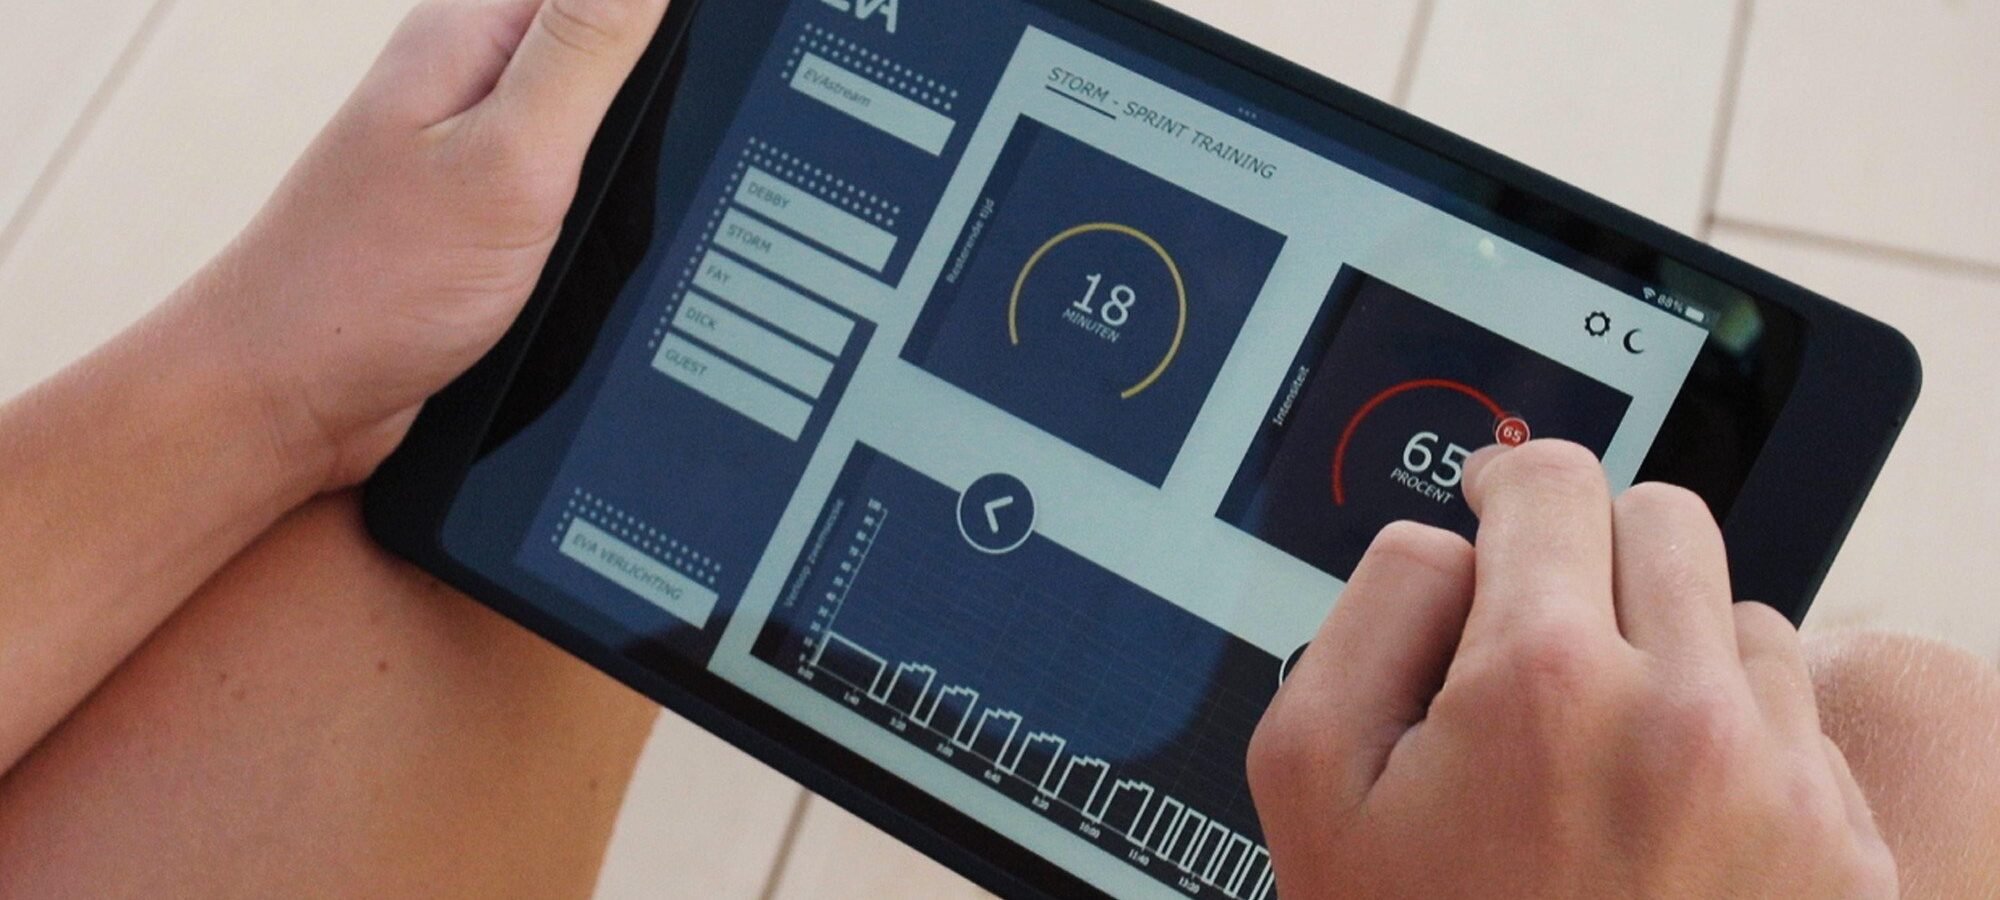
EVA Web app
Netzwerkverbindung
Netzwerkverbindung: Wählen Sie Ihr Netzwerk
Das ECA-Control-System kann auf zwei Arten verbunden werden:
- Über das eigene Netzwerk des ECA Control – Nützlich für den direkten Zugriff, wenn kein externes Netzwerk verfügbar ist.
- Über Ihr Heimnetzwerk (empfohlen) – Verbindung über Ethernet oder WLAN. Das Gerät ist erreichbar, solange es sich innerhalb der Reichweite Ihres lokalen Netzwerks befindet. Dies ermöglicht Fernzugriff und eine nahtlose Integration.
1. ECA-Netzwerk (Access-Point-Modus)
So wird der EVA Controller ausgeliefert.
Diese Option ist geeignet, wenn das Heimnetzwerk rund um den Pool keine ausreichende Abdeckung bietet:
- Das ECA Control erstellt ein eigenes WLAN-Netzwerk (AP-Modus), das eine direkte Verbindung ermöglicht.
- Das Tablet verbindet sich mit diesem Netzwerk, um das ECA Control zu bedienen.
- Eine Erweiterung der Reichweite des Heimnetzwerks ist nicht erforderlich.
- Während der Nutzung dieses Netzwerks besteht keine Internetverbindung.
Schritt 1
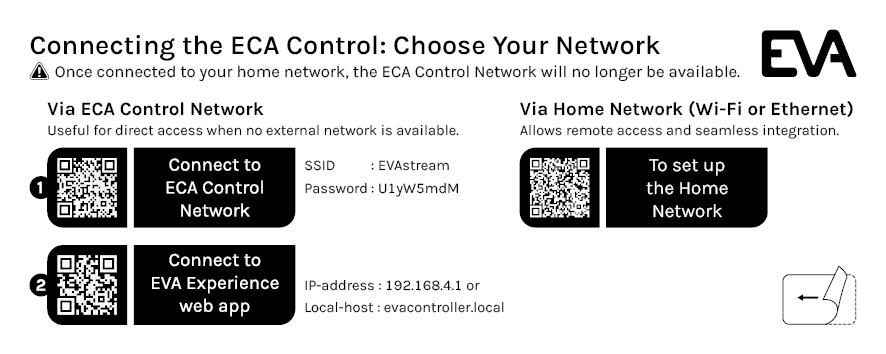
Befolgen Sie die folgenden Schritte, um sich über das ECA Control zu verbinden (Details finden Sie auf dem Aufkleber am ECA Control oder scannen Sie die QR-Codes auf dem Aufkleber für einen Schnellzugriff).
Schritt 1 – Mit dem WLAN-Netzwerk verbinden:
- Netzwerkname (SSID): EVAcontroller AP ######
- Passwort: U1yW5mdM
Schritt 2 – Öffnen Sie Ihren Webbrowser und geben Sie eine der folgenden Adressen ein:
- IP-Adresse: 192.168.4.1
- Lokaler Hostname: evacontroller.local
Schritt 2
Tablet mit der EVAwebapp-Umgebung verbinden
Öffnen Sie Ihren Internetbrowser und geben Sie folgende Adresse in die Adresszeile ein:
- Android: 192.168.4.1 (IP-Adresse)
- iOS und Windows: evacontroller.local
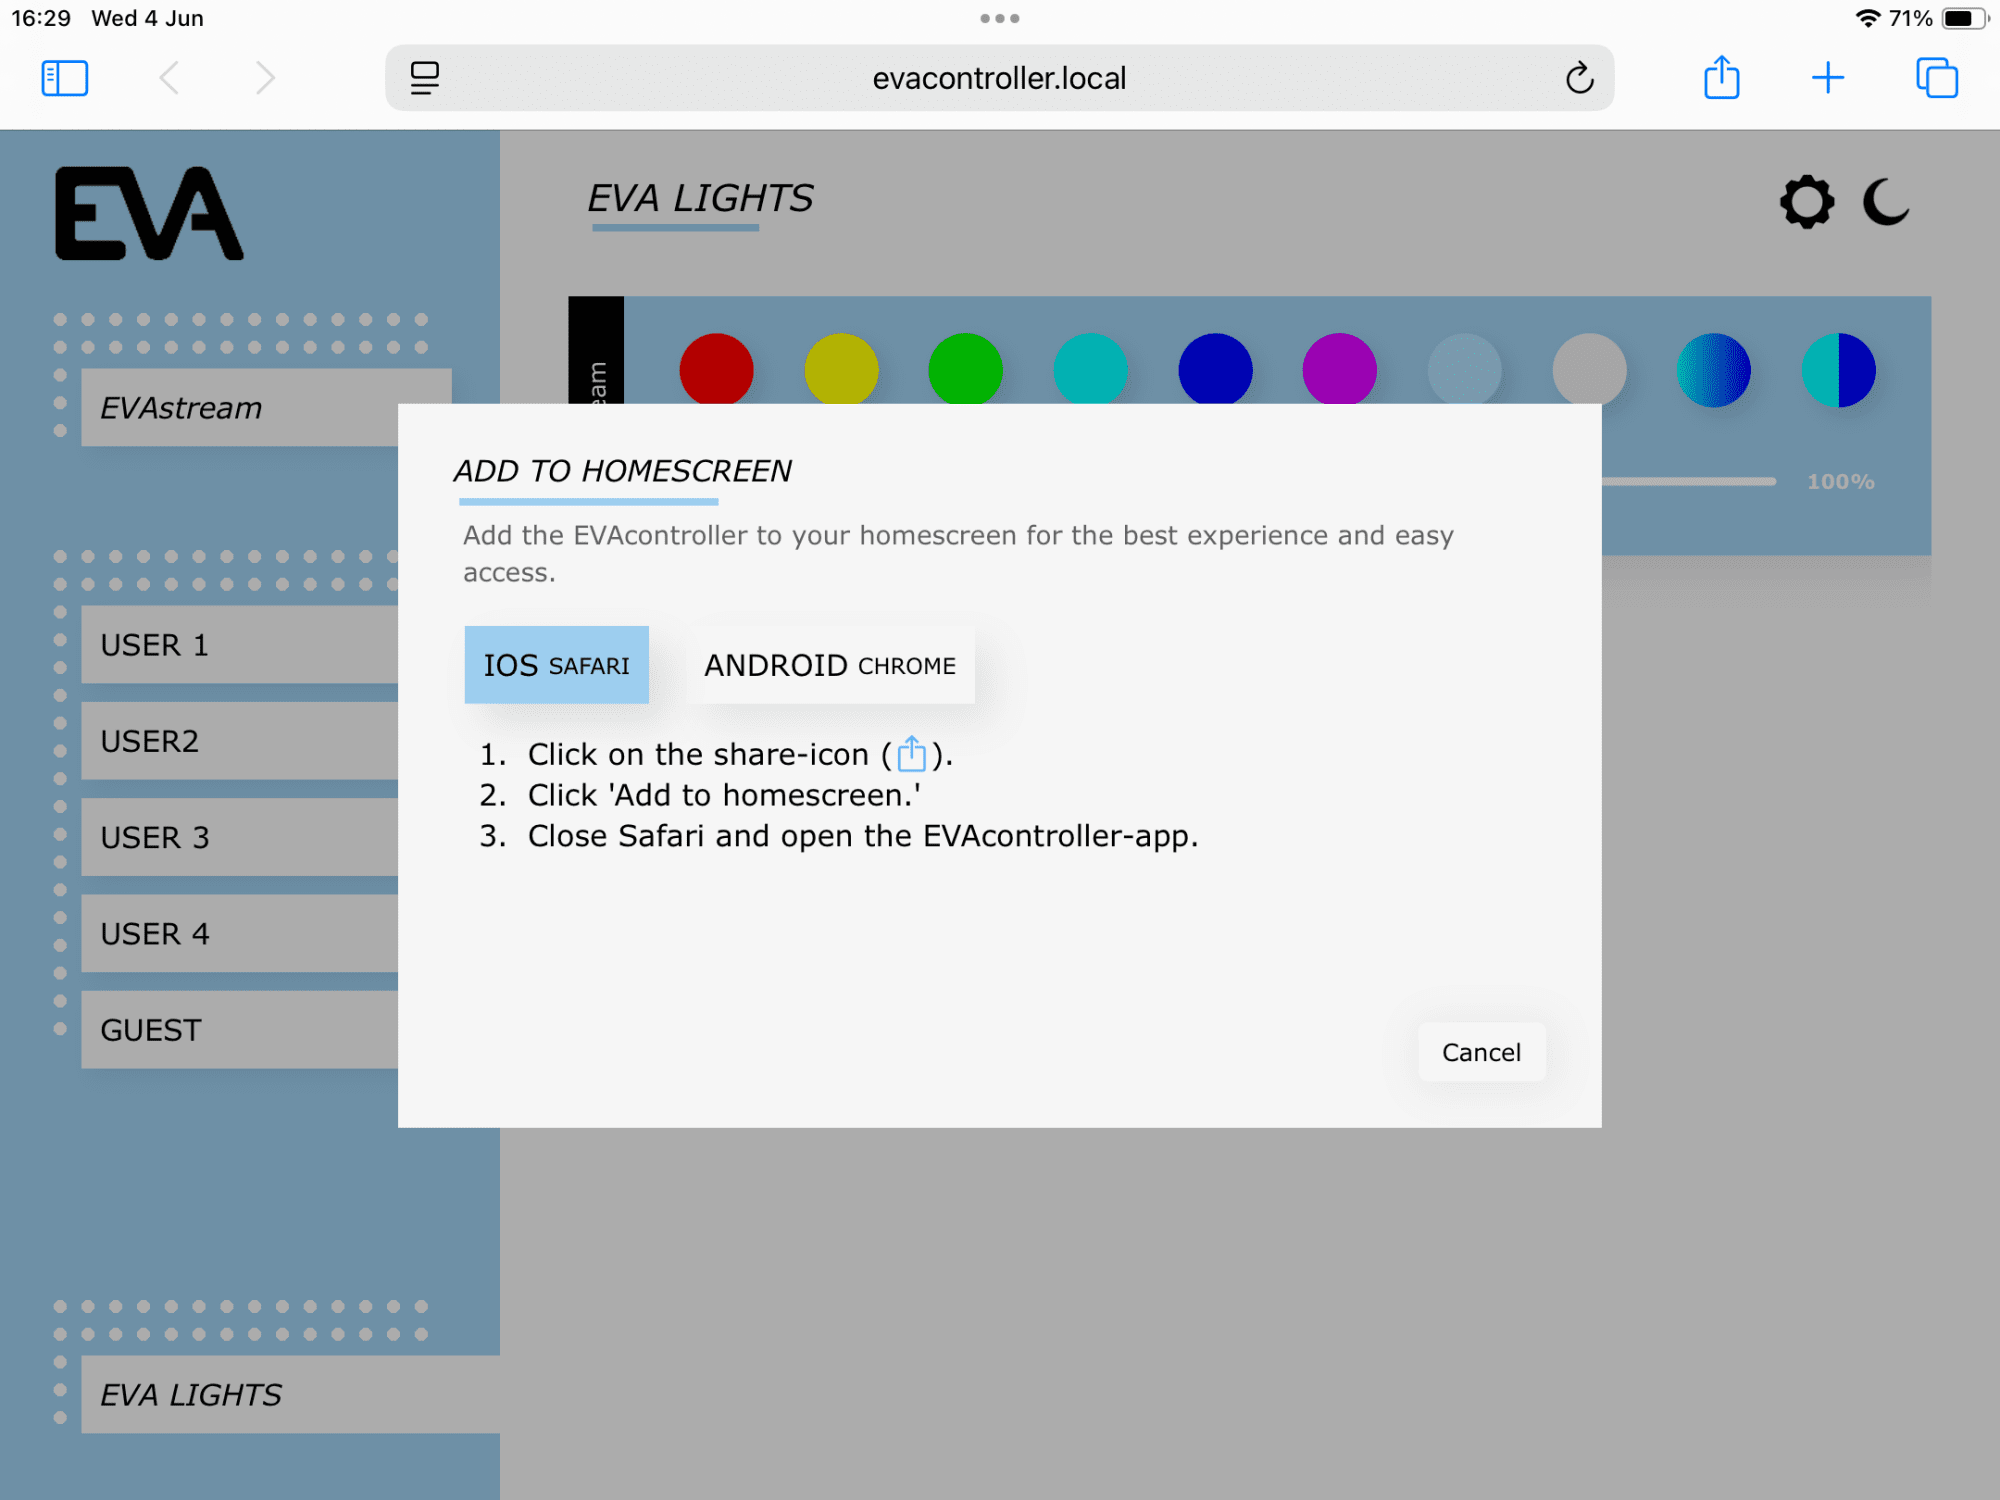
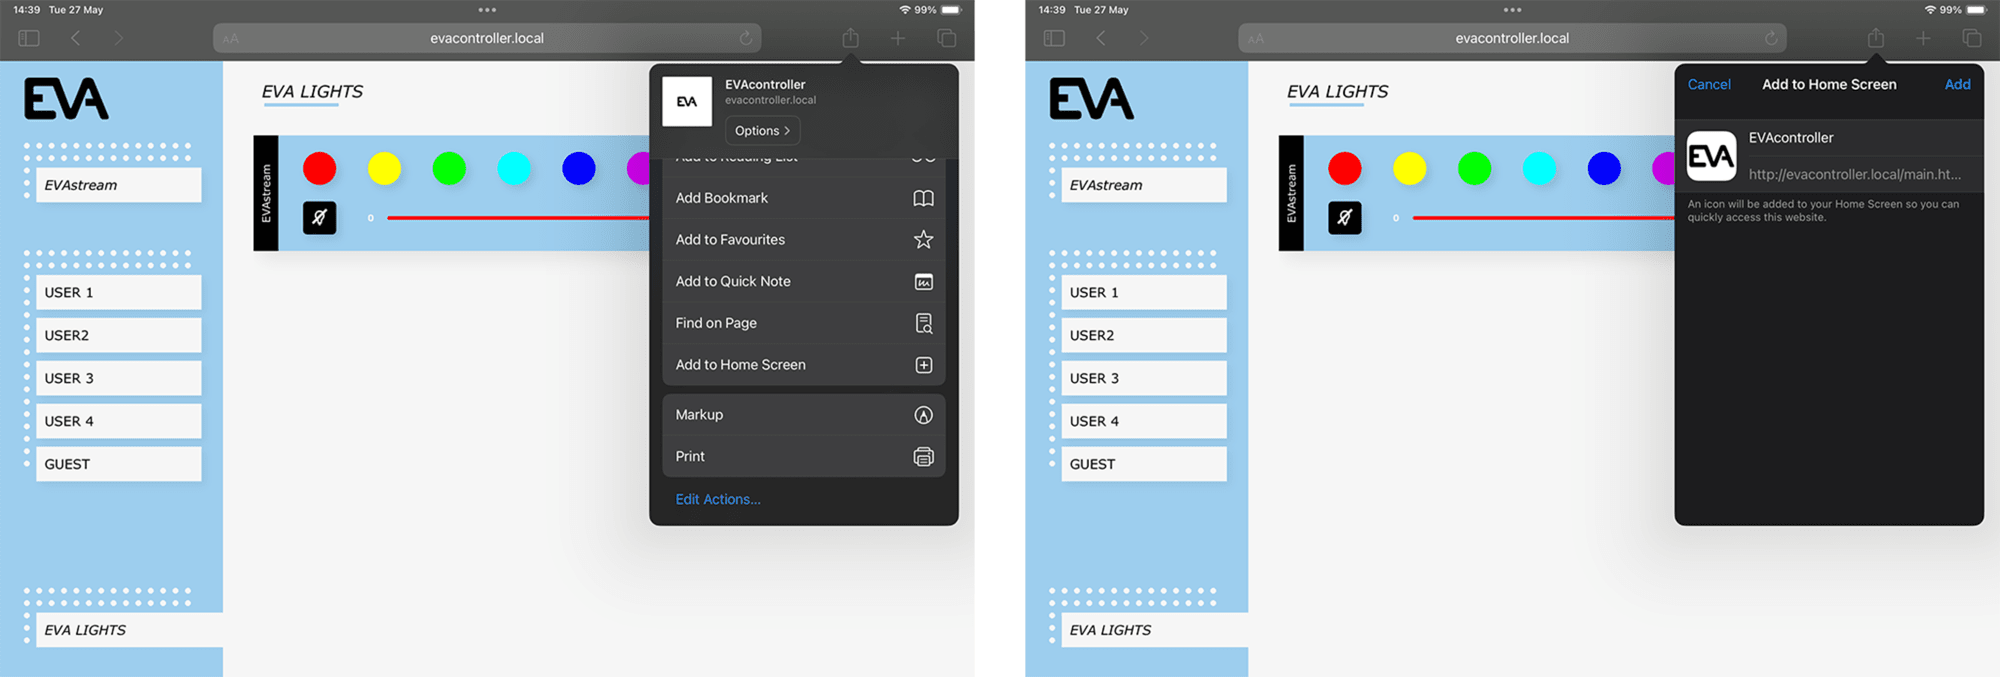
EVAwebapp zum Startbildschirm hinzufügen
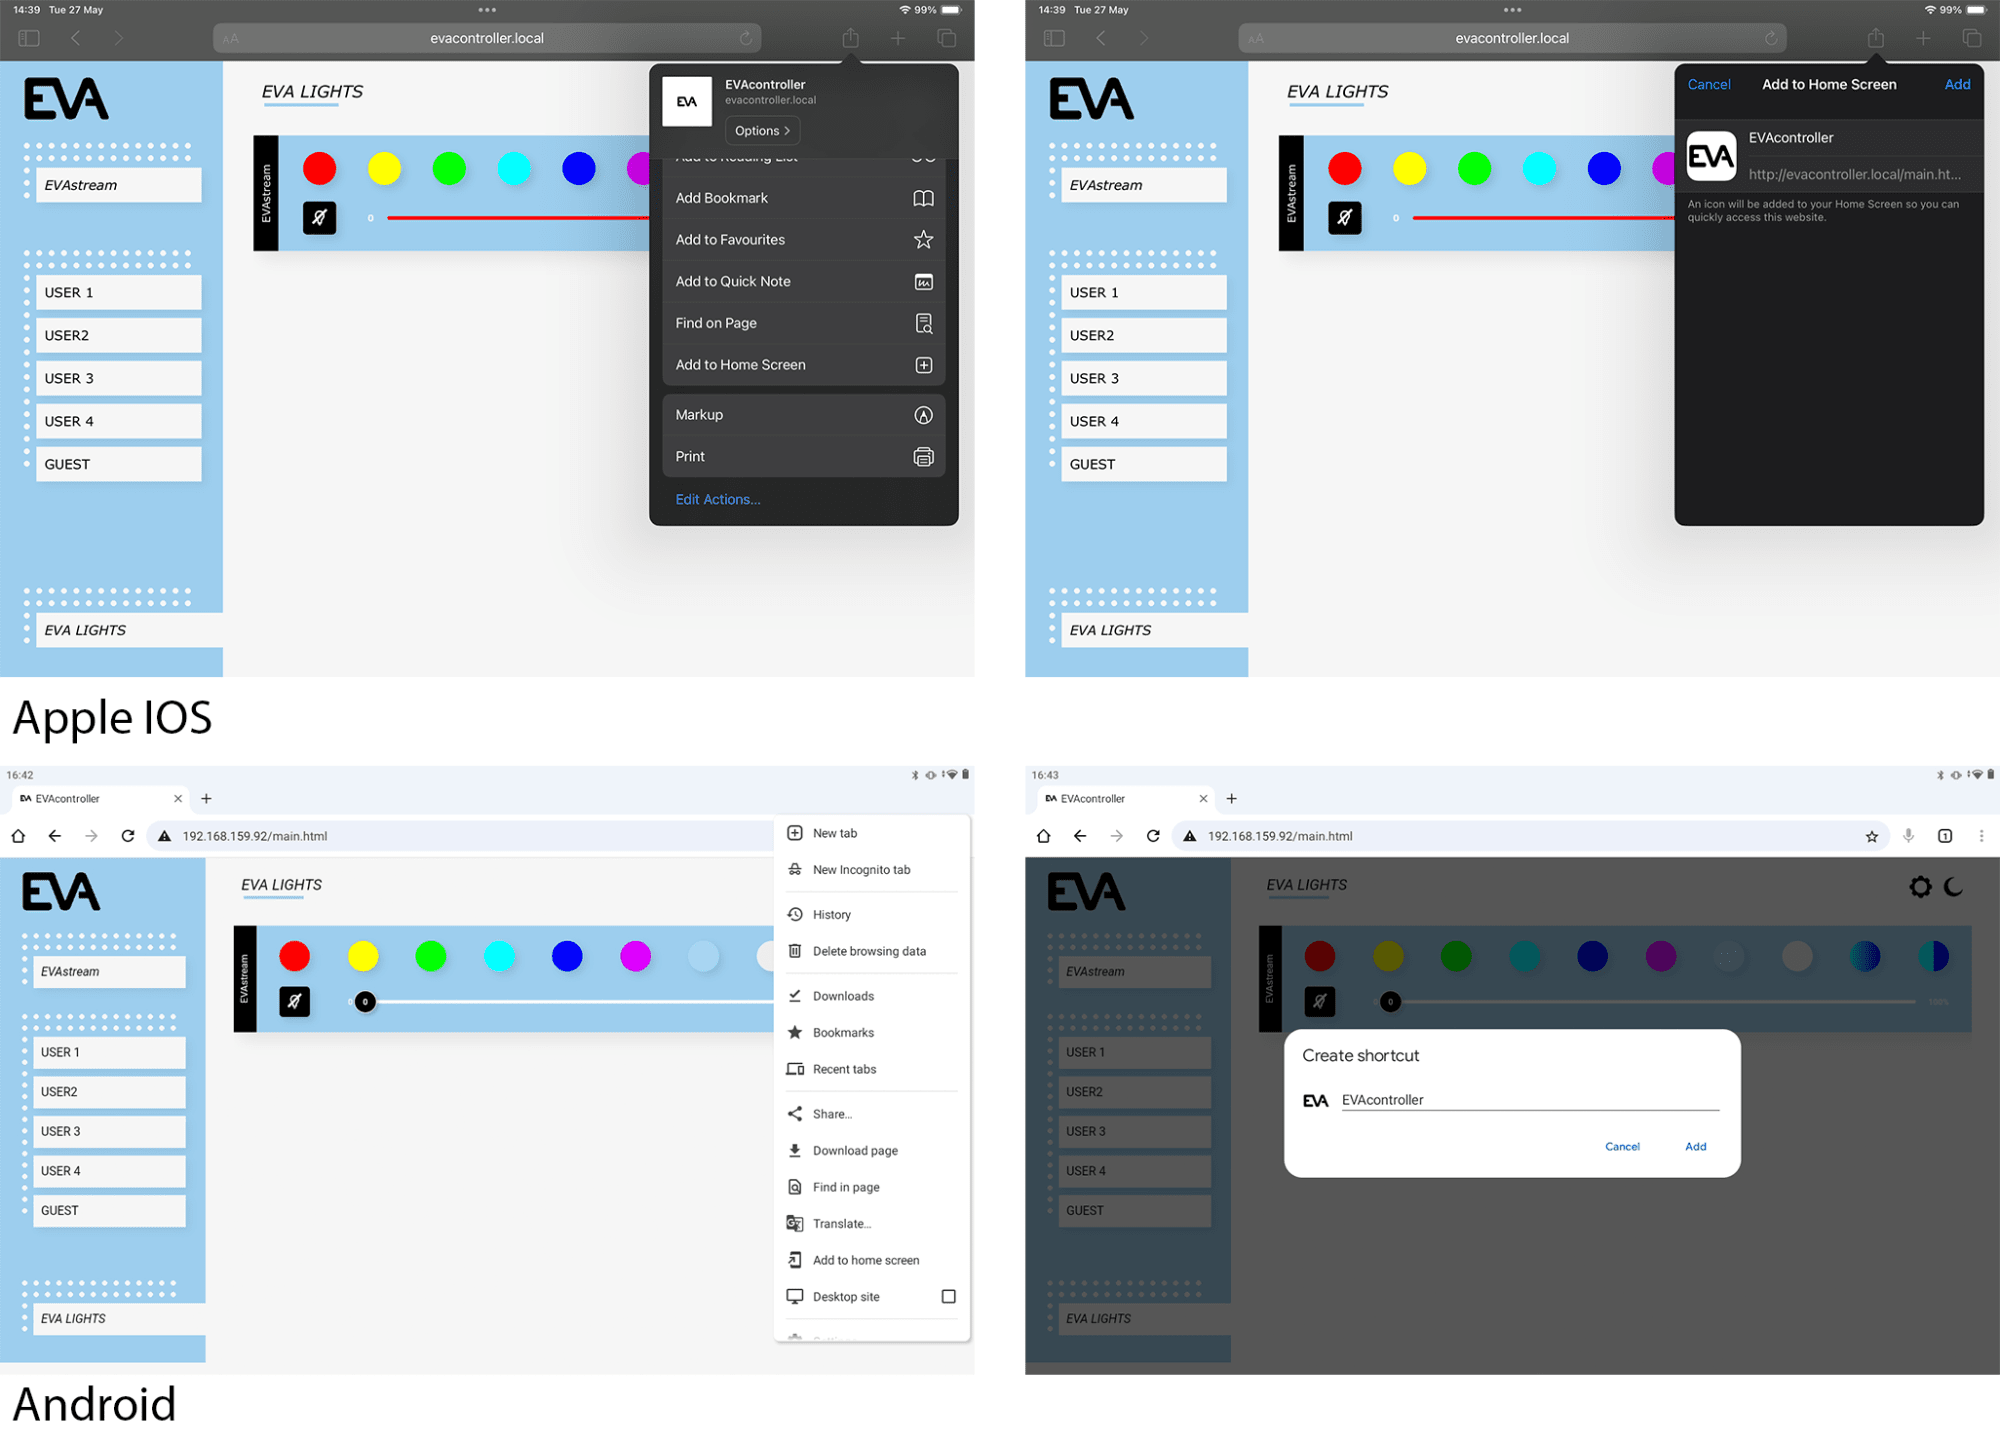
Das Pop-up-Fenster enthält Anweisungen zum Erstellen eines EVA-Verknüpfungssymbols auf dem Startbildschirm Ihres Tablets und/oder Smartphones, um künftig einen schnellen Zugriff auf die EVAwebapp zu ermöglichen.
- Klicken Sie auf das Teilen-Symbol rechts neben der Adresszeile.
- Wählen Sie Zum Home-Bildschirm hinzufügen.
- Benennen Sie das Symbol EVAstream und wählen Sie Hinzufügen.
- Das Symbol wird nun auf Ihrem Startbildschirm angezeigt.
- Schließen Sie den Webbrowser und tippen Sie auf die Verknüpfung zur EVAwebapp auf Ihrem Startbildschirm.
2. Heimnetzwerk (empfohlen)
Diese Option wird empfohlen, wenn das Heimnetzwerk rund um den Pool eine ausreichende Abdeckung bietet.
- Bei Verwendung eines Ethernet-Kabels wird die Verbindung automatisch hergestellt. Sobald das Ethernet-Kabel angeschlossen ist, wechselt der EVA Controller automatisch in den Ethernet-Modus. Der AP-Modus wird deaktiviert.
- Bei einer WLAN-Verbindung müssen zunächst die Schritte für den Station-Modus abgeschlossen werden, bevor Sie fortfahren (siehe „Ethernet-Einrichtung & Station-Modus-Einrichtung“ unten).
Wenn ein VPN verwendet wird, sollte dieses deaktiviert sein.
iOS & Windows – Ethernet-Einrichtung
Verbinden Sie den EVA Controller über ein Netzwerkkabel mit Ethernet.
Schritt 1
Ethernet verbinden
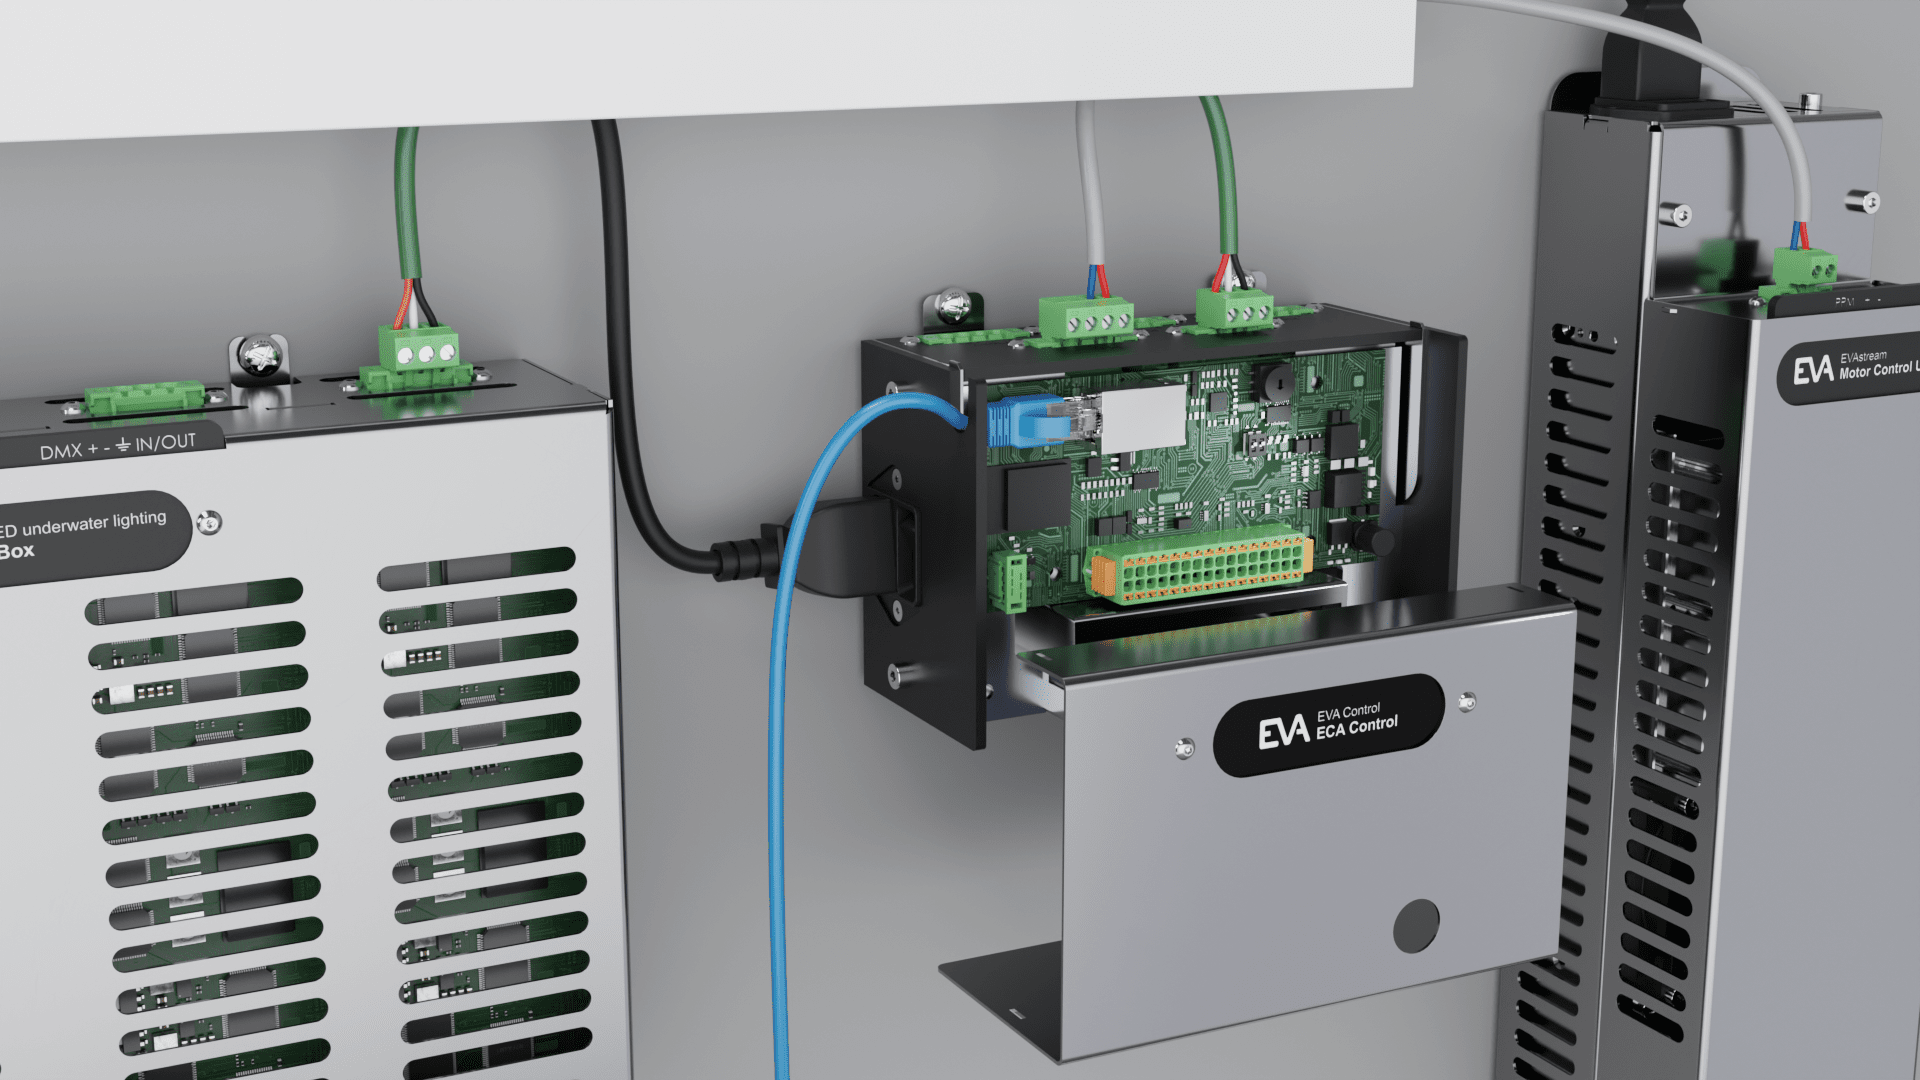
Entfernen Sie die Abdeckung des ECA Control, um Zugang zur EVA-Controller-Platine zu erhalten. Es sind keine Werkzeuge erforderlich; die Abdeckung ist oben und unten mit einem Klickmechanismus befestigt.
Stecken Sie das Ethernet-Kabel in das ECA Control.
Schritt 2
Tablet mit dem Heimnetzwerk verbinden
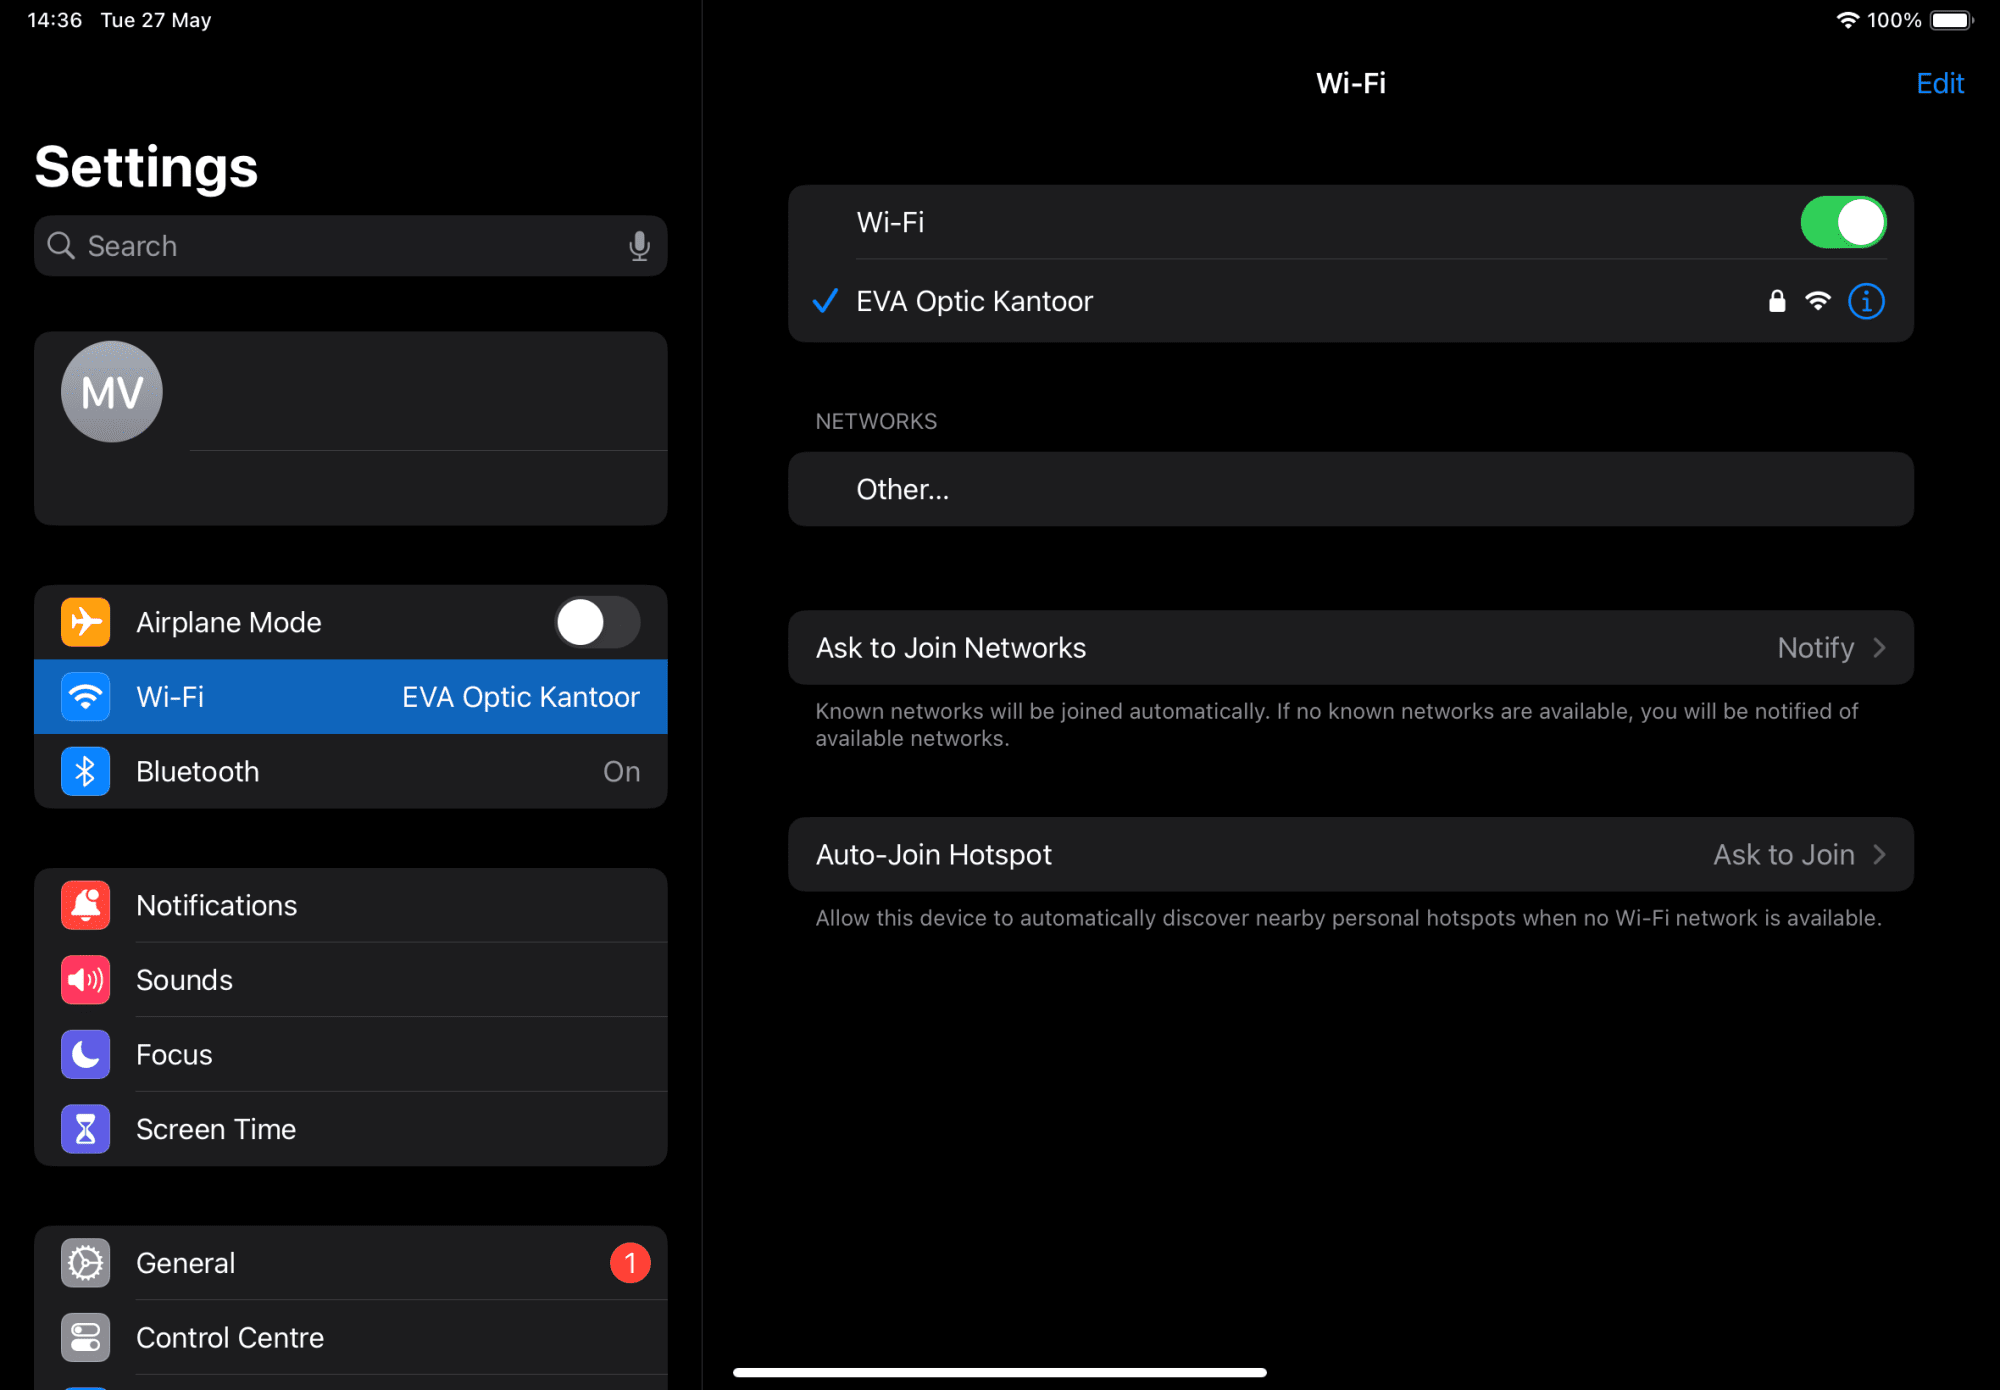
Öffnen Sie auf dem Tablet die WLAN-Einstellungen und verbinden Sie sich mit Ihrem Heimnetzwerk.
Schritt 3
Tablet mit der EVAwebapp-Umgebung verbinden
Öffnen Sie Ihren Internetbrowser und geben Sie folgende Adresse in die Adresszeile ein:
iOS und Windows: evacontroller.local

Für iOS: EVAwebapp zum Startbildschirm hinzufügen
Das Pop-up-Fenster enthält Anweisungen zum Erstellen eines EVA-Verknüpfungssymbols auf dem Startbildschirm Ihres Tablets und/oder Smartphones, um künftig einen schnellen Zugriff auf die EVAwebapp-Umgebung zu ermöglichen.
- Tippen Sie auf das Teilen-Symbol rechts neben der Adresszeile.
- Wählen Sie Zum Home-Bildschirm hinzufügen.
- Benennen Sie das Symbol EVAstream und wählen Sie Hinzufügen.
- Das Symbol wird nun auf Ihrem Startbildschirm angezeigt.
- Schließen Sie den Webbrowser und tippen Sie auf die Verknüpfung zur EVAwebapp auf Ihrem Startbildschirm.
iOS & Windows – Ethernet-Einrichtung & Station-Mode-Einrichtung
Verbinden Sie den EVA Controller über ein Netzwerkkabel mit Ethernet.
Schritt 1
Verbindung über Ethernet
Entfernen Sie die Abdeckung des ECA Control, um Zugang zur EVA-Controller-Platine (PCB) zu erhalten. Es sind keine Werkzeuge erforderlich; die Abdeckung ist oben und unten mit einem Klickmechanismus befestigt.
Stecken Sie das Ethernet-Kabel in das ECA Control.
Verbindung im Station Mode
Im Station Mode ist in diesem Schritt keine Aktion erforderlich.

Schritt 2
Setup-Modus aktivieren
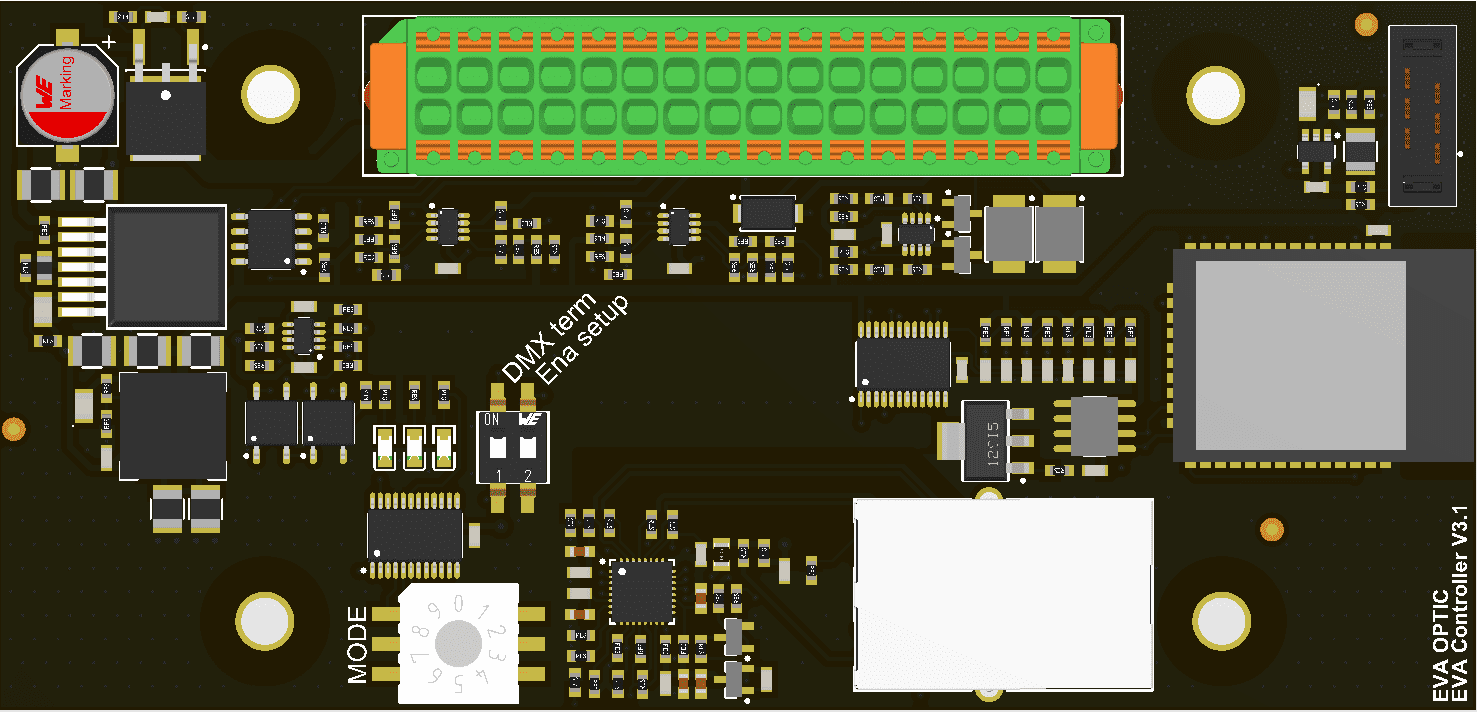
Um das ECA Control über WLAN mit dem Heimnetzwerk zu verbinden, aktivieren Sie den WLAN-Setup-Modus:
Entfernen Sie die Abdeckung des ECA Control, um Zugang zur EVA-Controller-Platine (PCB) zu erhalten.
Stellen Sie auf der EVA-Controller-Platine den Schalter Enable setup auf ON (Schiebeschalter 2 auf ON).
Schritt 3
Tablet mit dem ECA Control verbinden
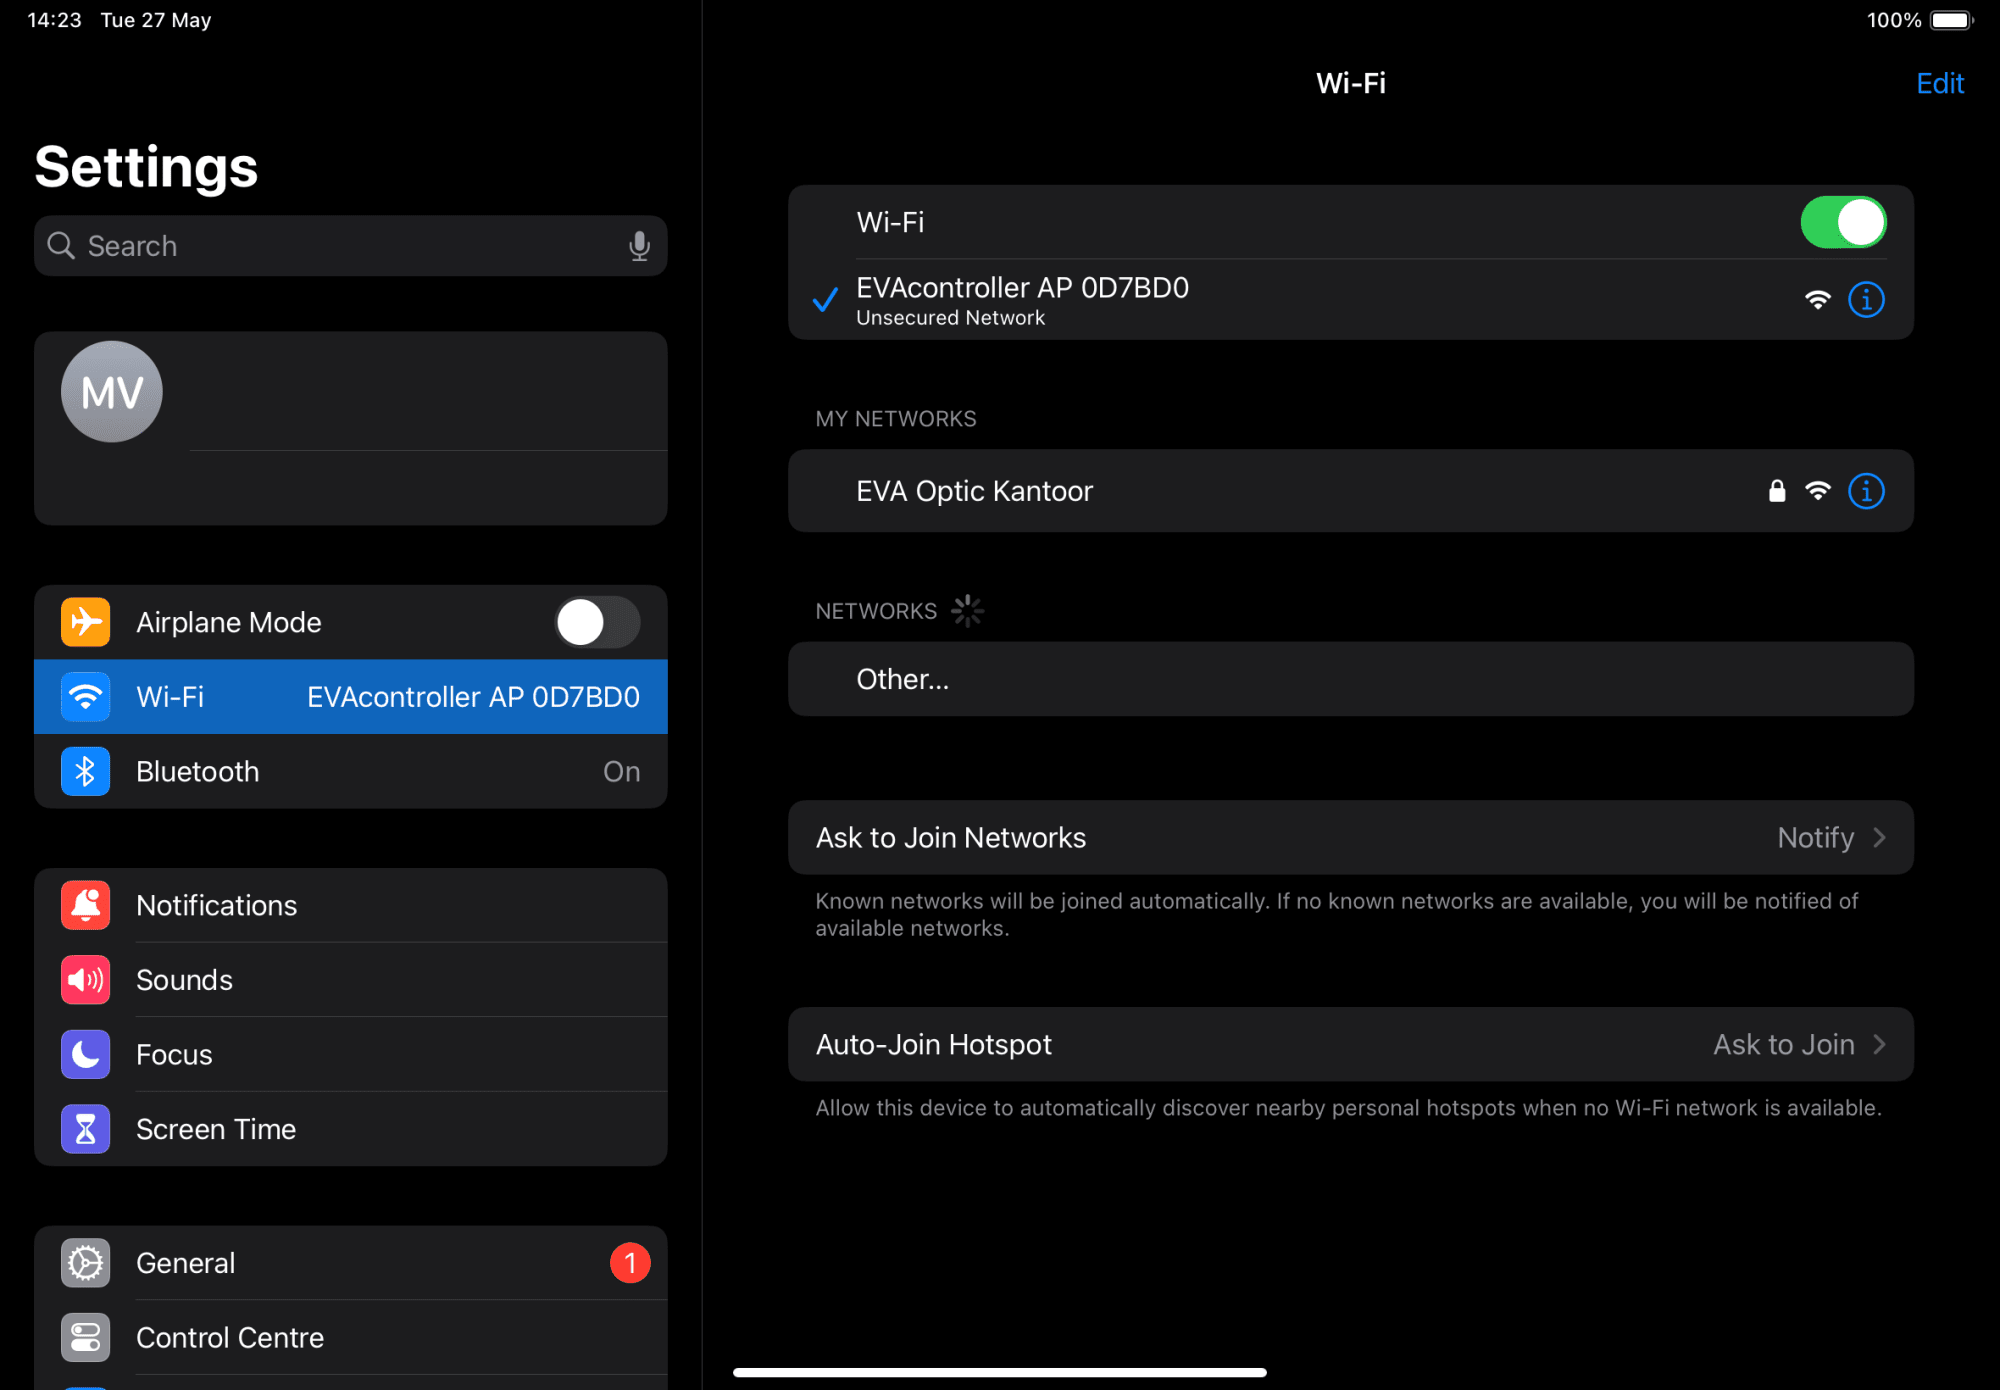
Öffnen Sie auf dem Tablet die WLAN-Einstellungen und verbinden Sie sich mit dem Netzwerk:
EVAcontroller AP ######
Das EVA-Logo erscheint, sobald die App automatisch startet.
Falls die App nicht automatisch startet:
Öffnen Sie nach der Verbindung mit EVAcontroller AP###### Ihren Internetbrowser und geben Sie folgende Adresse in die Adresszeile ein:
- Android: 192.168.4.1 (IP-Adresse)
- iOS und Windows: evacontroller.local
Schritt 4
EVA-Controller-Platine mit dem WLAN verbinden
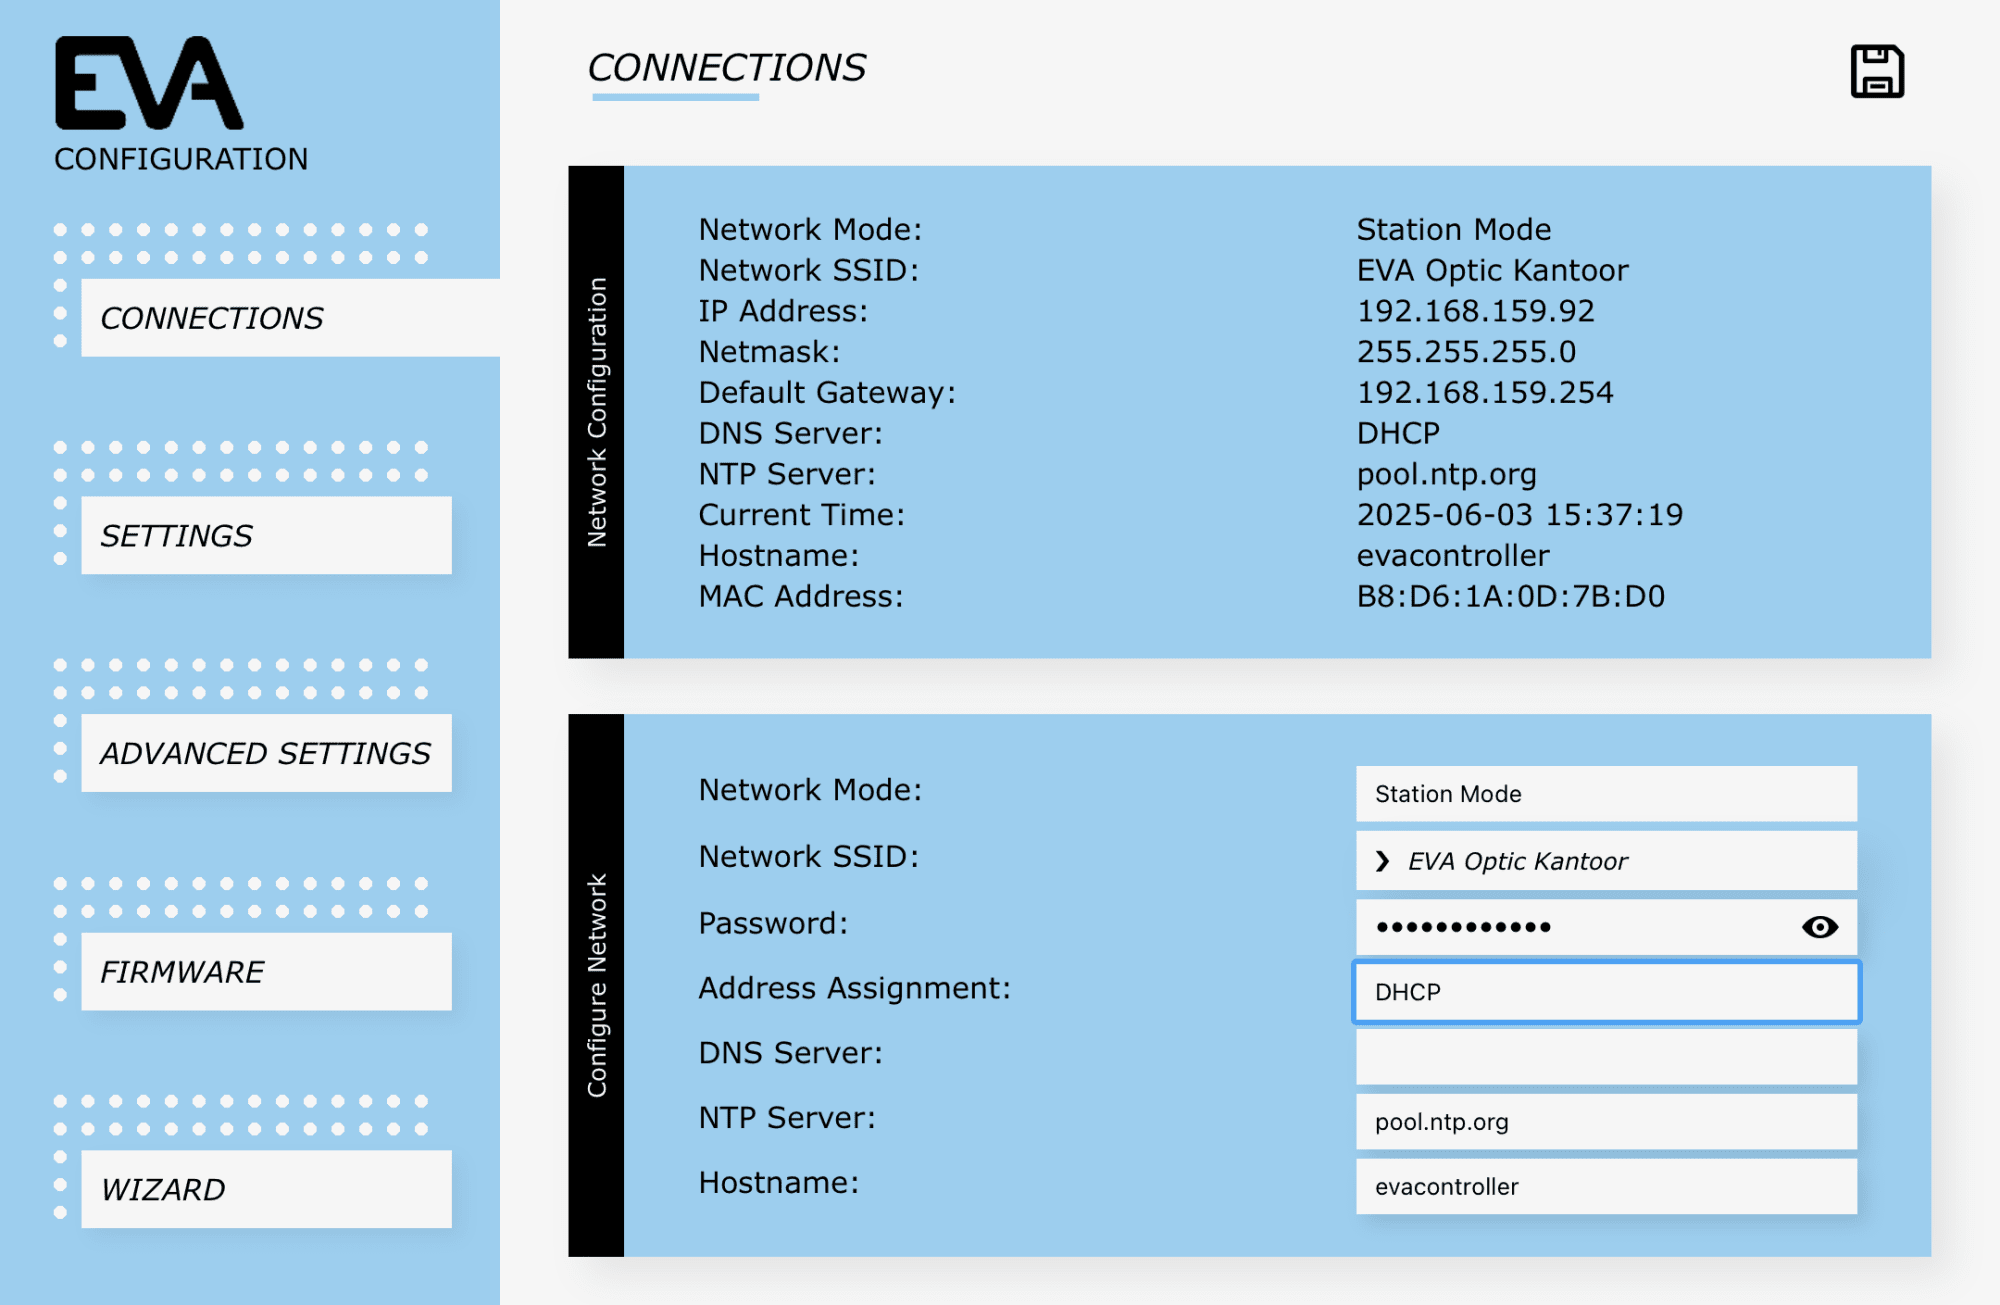
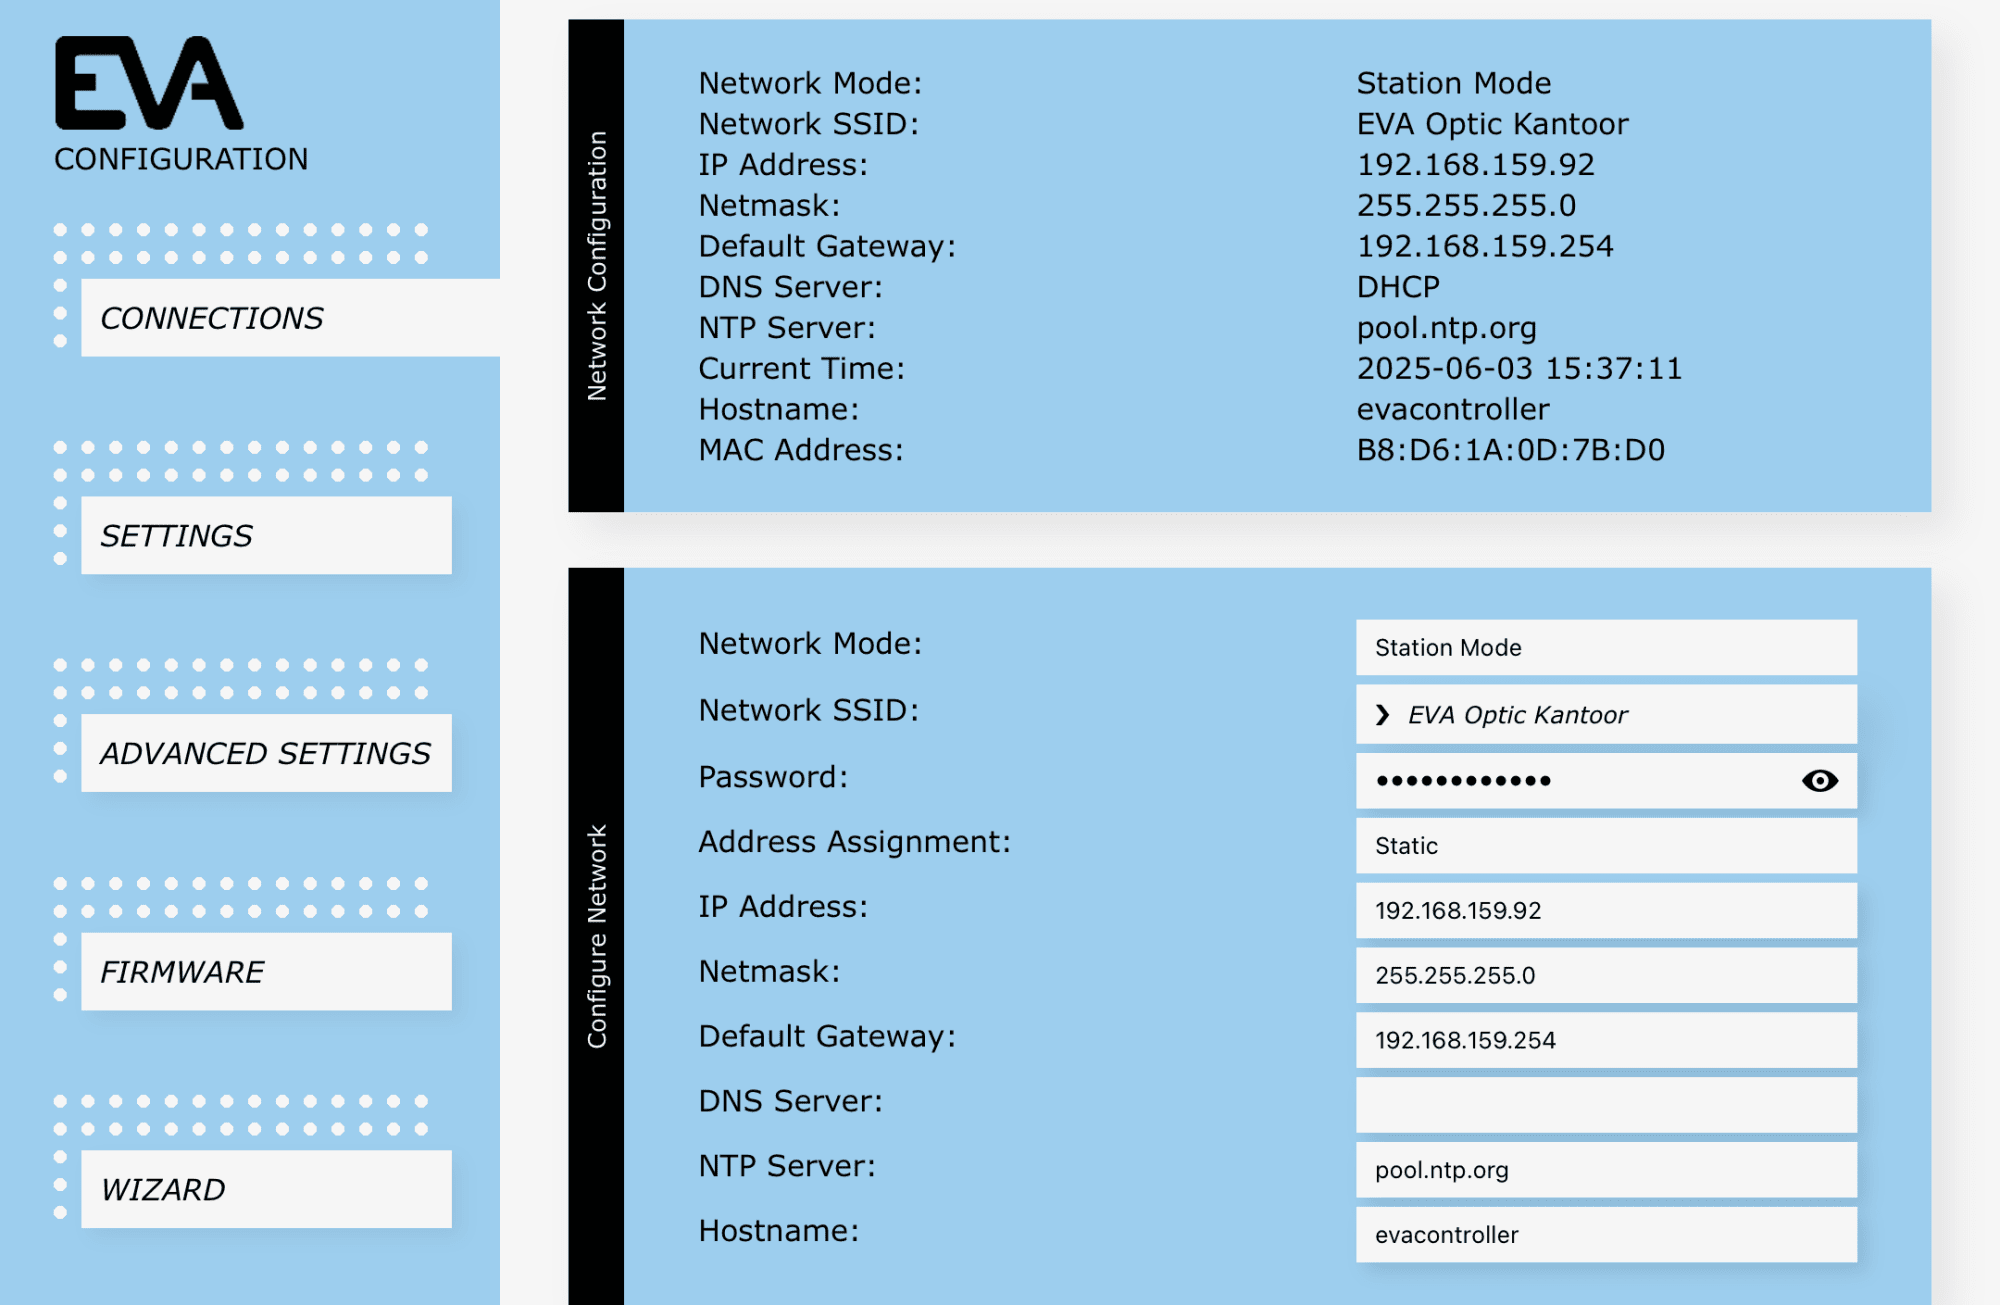
- Wählen Sie neben Network Mode den Station Mode.
- Wählen Sie neben Network SSID Ihr Heimnetzwerk aus.
- Geben Sie neben Password Ihr Passwort ein.
- Die Adresszuweisung ist standardmäßig auf DHCP eingestellt.
- Das Feld DNS Server sollte leer bleiben.
- Prüfen Sie, ob neben Hostname evacontroller eingetragen ist.
- Die übrigen Einstellungen müssen in der Regel nicht geändert werden. Klicken Sie oben rechts auf das Speichern-Symbol.
Wenn das Speichern erfolgreich war, fahren Sie mit dem nächsten Schritt fort. Erhalten Sie beim Speichern eine Fehlermeldung, tragen Sie das Standard-Gateway in das Feld DNS Server ein. Sollte dies nicht funktionieren, geben Sie 8.8.8.8 in das Feld DNS Server ein.
Wichtig: Ändern Sie den Hostnamen während der Einrichtung nicht. Eine Änderung würde den Netzwerknamen des Geräts verändern und kann zu Verwirrung führen, da er dann nicht mehr mit den Angaben im Handbuch übereinstimmt.
Schritt 5
Setup-Modus deaktivieren
Um die Verbindung abzuschließen und sicherzustellen, dass die EVA-Controller-Platine mit dem Heimnetzwerk verbunden bleibt:
- Stellen Sie auf der EVA-Controller-Platine den Schalter Enable setup auf OFF (Schiebeschalter 2 zurück auf OFF). Die Verbindung zum EVAcontroller AP ###### wird getrennt.
- Das ECA Control bleibt nun mit dem Heimnetzwerk verbunden.

Schritt 6
Tablet mit dem Heimnetzwerk verbinden
Öffnen Sie auf dem Tablet die WLAN-Einstellungen und verbinden Sie sich mit dem Heimnetzwerk.

Schritt 7
Tablet mit der EVAwebapp-Umgebung verbinden
Öffnen Sie Ihren Internetbrowser und geben Sie folgende Adresse in die Adresszeile ein:
- iOS und Windows: evacontroller.local

Für iOS: EVAwebapp zum Startbildschirm hinzufügen
Das Pop-up-Fenster enthält Anweisungen zum Erstellen eines EVA-Verknüpfungssymbols auf dem Startbildschirm Ihres Tablets und/oder Smartphones, um künftig einen schnellen Zugriff auf die EVAwebapp zu ermöglichen.
- Tippen Sie auf das Teilen-Symbol rechts neben der Adresszeile.
- Wählen Sie Zum Home-Bildschirm hinzufügen.
- Benennen Sie das Symbol EVAstream und wählen Sie Hinzufügen.
- Das Symbol wird nun auf Ihrem Startbildschirm angezeigt.
- Schließen Sie den Webbrowser und tippen Sie auf die Verknüpfung zur EVAwebapp auf Ihrem Startbildschirm.

Android – Ethernet-Einrichtung
Verbinden Sie den EVA Controller über ein Netzwerkkabel mit Ethernet.
Schritt 1
Verbindung über Ethernet
Entfernen Sie die Abdeckung des ECA Control, um Zugang zur EVA-Controller-Platine (PCB) zu erhalten. Es sind keine Werkzeuge erforderlich; die Abdeckung ist oben und unten mit einem Klickmechanismus befestigt.
Stecken Sie das Ethernet-Kabel in das ECA Control.
Verbindung im Station Mode
Im Station Mode ist in diesem Schritt keine Aktion erforderlich.

Schritt 2
Setup-Modus aktivieren
Um das ECA Control über Station Mode oder Ethernet mit dem Heimnetzwerk zu verbinden, aktivieren Sie den WLAN-Setup-Modus:
- Entfernen Sie die Abdeckung des ECA Control, um Zugang zur EVA-Controller-Platine (PCB) zu erhalten.
- Stellen Sie auf der EVA-Controller-Platine den Schalter Enable setup auf ON (Schiebeschalter 2 auf ON).

Schritt 3
Tablet oder Laptop mit dem ECA Control verbinden
Öffnen Sie auf dem Tablet oder Laptop die WLAN-Einstellungen und verbinden Sie sich mit dem Netzwerk:
EVAcontroller AP ######
Das EVA-Logo erscheint, sobald die App automatisch startet.
Falls die App nicht automatisch startet:
Öffnen Sie nach der Verbindung mit EVAcontroller AP###### Ihren Internetbrowser und geben Sie folgende Adresse in die Adresszeile ein:
- Android: 192.168.4.1 (IP-Adresse)

Schritt 4
EVA Controller mit neuem Netzwerk verbinden
Verbindung über Station Mode
- Wählen Sie neben Network Mode den Station Mode.
- Wählen Sie neben Network SSID Ihr Heimnetzwerk aus.
- Geben Sie neben Password Ihr Passwort ein.
- Klicken Sie oben rechts auf das Speichern-Symbol. Nach erfolgreichem Speichern werden die für den nächsten Schritt benötigten Netzwerkdaten oben im Bildschirm angezeigt.
- Stellen Sie Address Assignment von DHCP auf Static.
- Verwenden Sie die oben angezeigte IP-Adresse und tragen Sie diese manuell in das Feld IP address ein. Notieren oder speichern Sie die IP-Adresse (Screenshot), da sie später für die Verbindung benötigt wird.
- Verwenden Sie die oben angezeigte Netmask und tragen Sie diese in das Feld Netmask ein.
- Verwenden Sie das oben angezeigte Default Gateway und tragen Sie dieses in das entsprechende Feld ein.
- Das Feld DNS Server sollte leer bleiben.
Die übrigen Einstellungen müssen in der Regel nicht geändert werden. Klicken Sie oben rechts auf das Speichern-Symbol.
Wenn das Speichern erfolgreich war, fahren Sie mit dem nächsten Schritt fort.
Erhalten Sie eine Fehlermeldung, tragen Sie das Default Gateway in das Feld DNS Server ein. Sollte dies nicht funktionieren, geben Sie 8.8.8.8 in das Feld DNS Server ein.
Verbindung über Ethernet
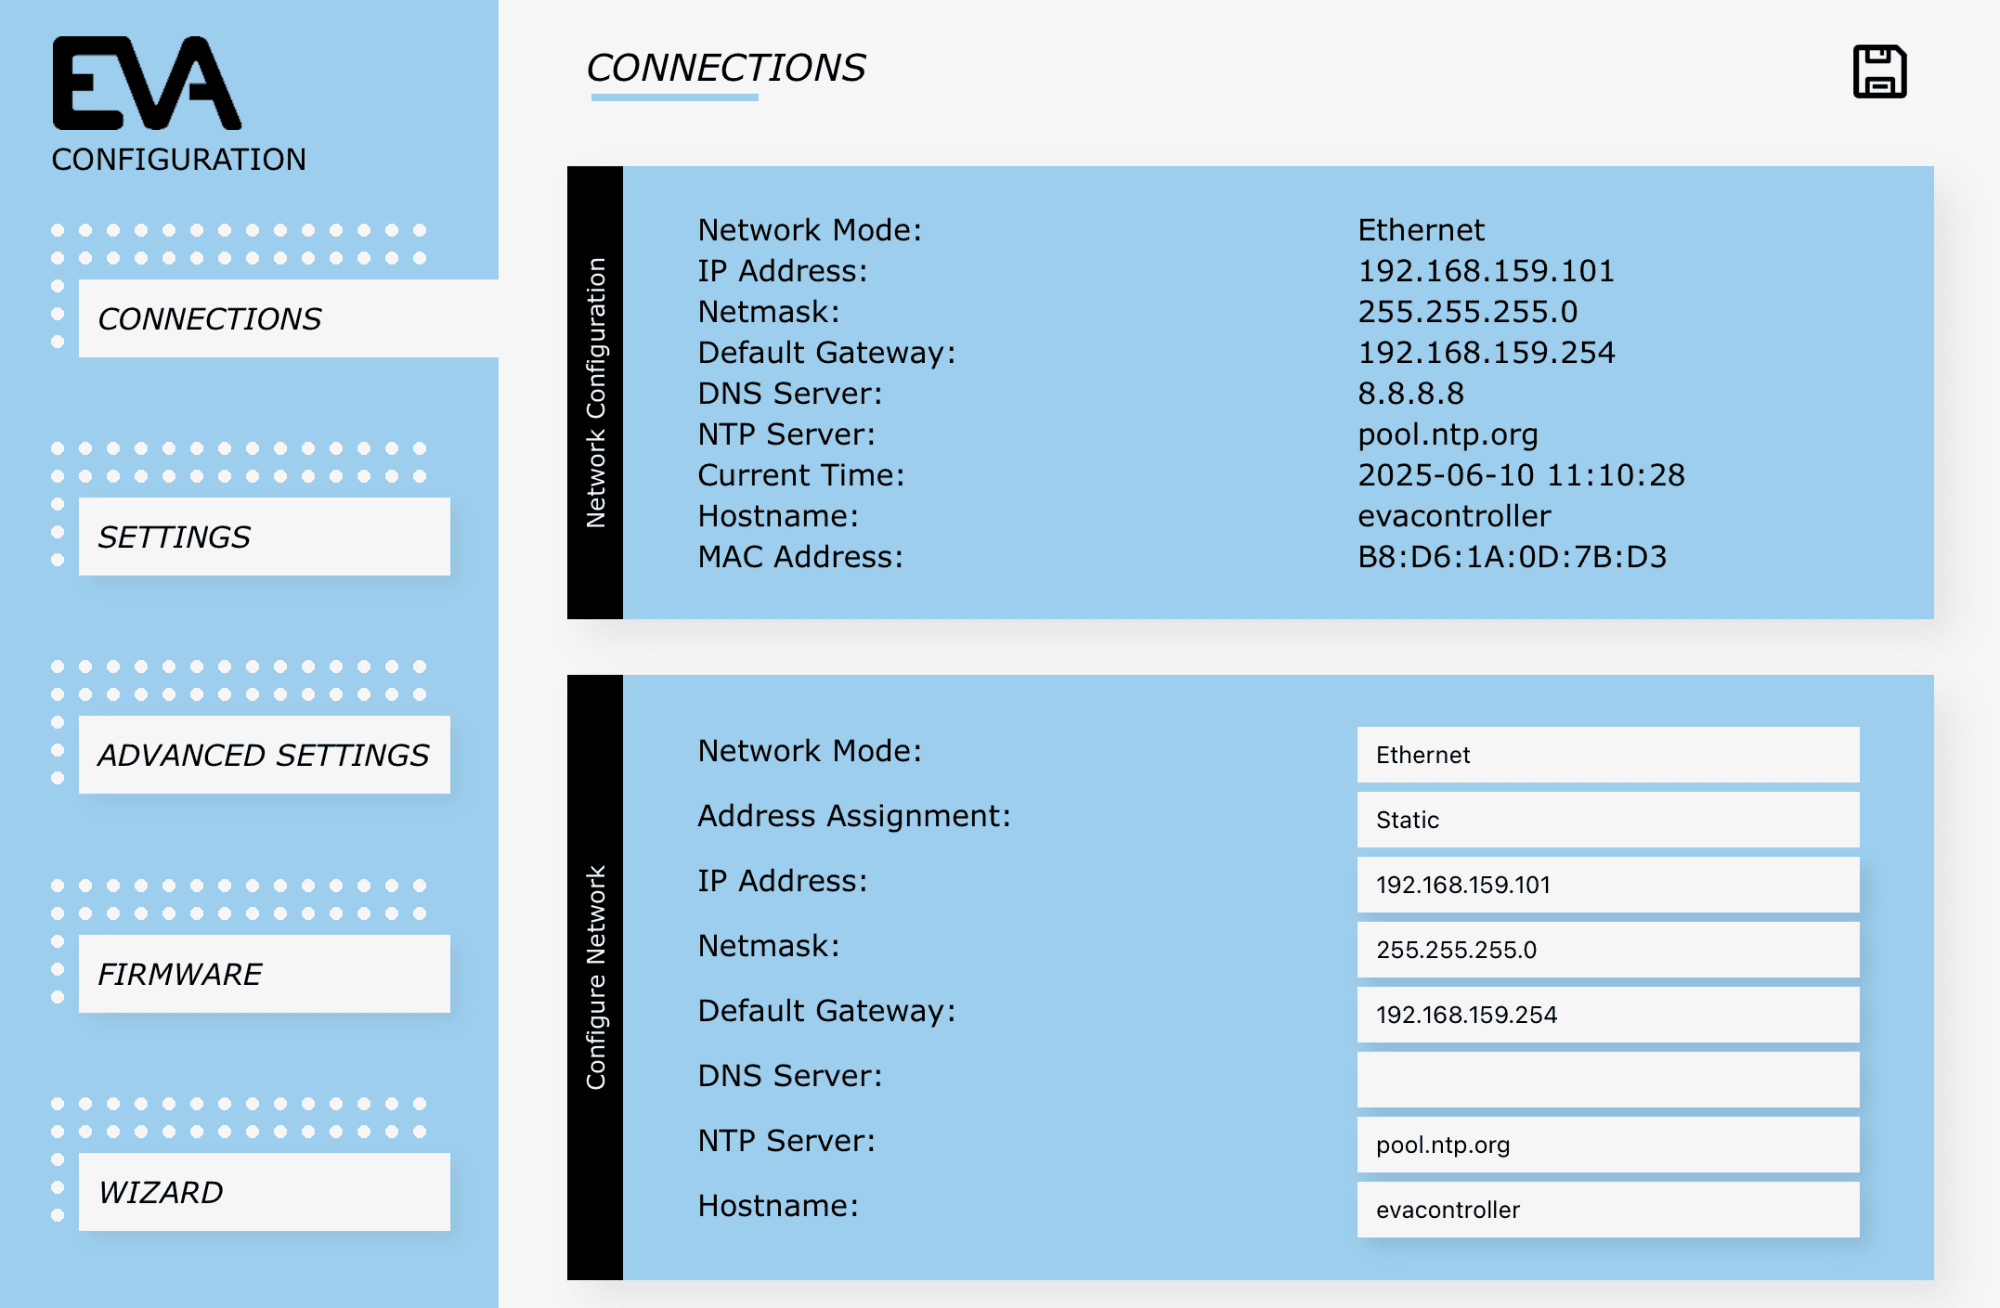
- Wählen Sie neben Network Mode die Option Ethernet.
- Stellen Sie Address Assignment von DHCP auf Static.
- Verwenden Sie die oben angezeigte IP-Adresse und tragen Sie diese manuell in das Feld IP address ein. Notieren oder speichern Sie die IP-Adresse (Screenshot), da sie später benötigt wird.
- Verwenden Sie die oben angezeigte Netmask und tragen Sie diese in das Feld Netmask ein.
- Verwenden Sie das oben angezeigte Default Gateway und tragen Sie dieses in das entsprechende Feld ein.
- Das Feld DNS Server sollte leer bleiben.
Die übrigen Einstellungen müssen in der Regel nicht geändert werden. Klicken Sie oben rechts auf das Speichern-Symbol.
Schritt 5
Setup-Modus deaktivieren
Um die Verbindung abzuschließen und sicherzustellen, dass die EVA-Controller-Platine mit dem Heimnetzwerk verbunden bleibt:
- Stellen Sie auf der EVA-Controller-Platine den Schalter Enable setup auf OFF (Schiebeschalter 2 zurück auf OFF). Die Verbindung zum EVAcontroller AP ###### wird getrennt.
- Das ECA Control bleibt nun mit dem Heimnetzwerk verbunden.

Schritt 6
Tablet mit dem Heimnetzwerk verbinden
Öffnen Sie auf dem Tablet die WLAN-Einstellungen und verbinden Sie sich mit dem Heimnetzwerk.

Schritt 7
Tablet mit der EVAwebapp-Umgebung verbinden
Öffnen Sie Ihren Internetbrowser und geben Sie folgende Adresse in die Adresszeile ein:
- Ihre persönliche IP-Adresse (diese Adresse ist individuell und einzigartig)

EVAwebapp zum Startbildschirm hinzufügen
Das Pop-up-Fenster enthält Anweisungen zum Erstellen eines EVA-Verknüpfungssymbols auf dem Startbildschirm Ihres Tablets und/oder Smartphones, um künftig einen schnellen Zugriff auf die EVAwebapp-Umgebung zu ermöglichen.
- Tippen Sie auf das Teilen-Symbol rechts neben der Adresszeile.
- Wählen Sie Zum Startbildschirm hinzufügen.
- Benennen Sie das Symbol EVAstream und wählen Sie Hinzufügen.
- Das Symbol wird nun auf Ihrem Startbildschirm angezeigt.
- Schließen Sie den Webbrowser und tippen Sie auf die Verknüpfung zur EVAwebapp auf Ihrem Startbildschirm.

Einstellungen für die erste Inbetriebnahme
Vor der ersten Nutzung der EVAwebapp-Umgebung wird empfohlen, einige Einstellungen vorzunehmen.
Verwenden Sie hierfür ein Tablet oder einen Laptop. Der Zugriff auf die Einstellungen über ein Smartphone ist aufgrund der begrenzten Bildschirmgröße nicht möglich.
Schritt 1
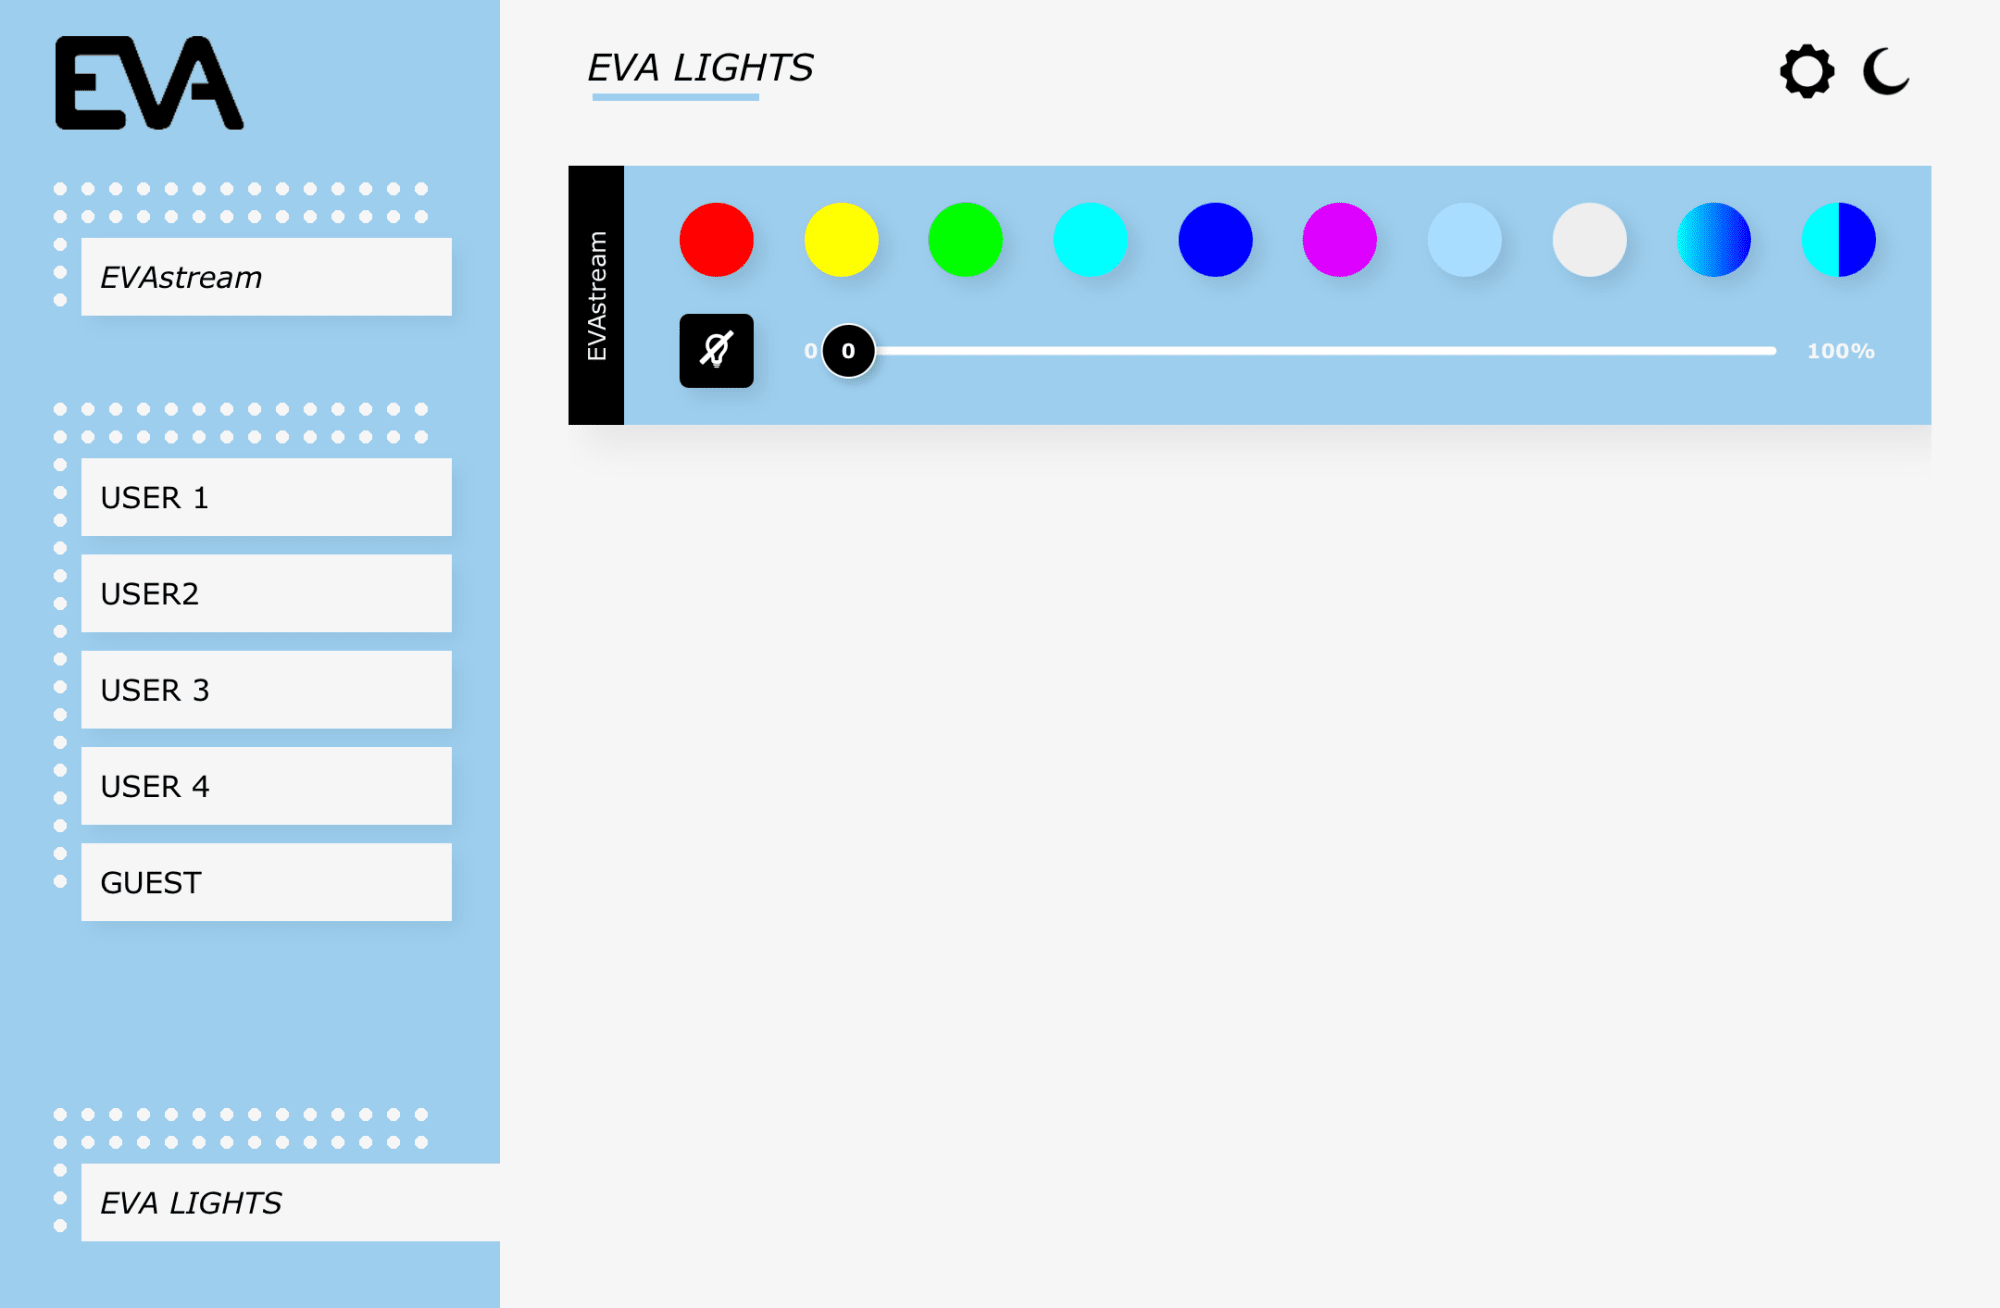
Die Beleuchtungsgruppe ist standardmäßig ausgeschaltet.
Tippen Sie auf das EVA-App-Symbol, das Sie in den vorherigen Schritten erstellt haben. Sie sehen nun die Startseite der EVAwebapp-Umgebung.
Schritt 2
Erweiterte Einstellungen
1. Tippen Sie zweimal auf das Zahnrad-Symbol oben rechts, um zu den erweiterten Einstellungen für verbundene EVA-Produkte zu gelangen.
2. Die verfügbaren Einstellungen hängen von der verwendeten Steuerungsversion ab. Weitere Informationen finden Sie im Kapitel „Übersicht der verschiedenen Steuerungen“.
- Die erweiterten Einstellungen sind mit der ECO-Version nicht verfügbar.
- Mit der Essential-Version sind sie nur teilweise verfügbar.
3. Die Beleuchtungsgruppe ist standardmäßig ausgeschaltet. Wählen Sie in der App die Anzahl der Gruppen unter Lighting groups und vergeben Sie eindeutige Namen unter Zones (unterer Bereich).
Geben Sie mehrere Zonen nur dann ein, wenn mehrere Lichtgruppen vorhanden sind, z. B. EVAstream-Leuchten, Jacuzzi-Leuchten usw.
Hinweis:
Die erste Gruppe ist immer die Beleuchtungsgruppe, die mit dem EVAstream verbunden ist. Die Beleuchtung in dieser Gruppe wechselt während des Trainingsprogramms automatisch die Farbe.
Steuerung der Beleuchtungsgruppen
Die vier Beleuchtungsgruppen können über folgende DMX-Kanäle gesteuert werden:
Gruppe 1 = DMX-Adresse 001 (Unterwasserbeleuchtung): Kanäle 1 bis 4 (Bei Einstellung auf diese Kanäle wechselt die Beleuchtung automatisch synchron zum EVAstream.)
Gruppe 2 = DMX-Adresse 011: Kanäle 11 bis 14
Gruppe 3 = DMX-Adresse 021: Kanäle 21 bis 24
Gruppe 4 = DMX-Adresse 031: Kanäle 31 bis 34
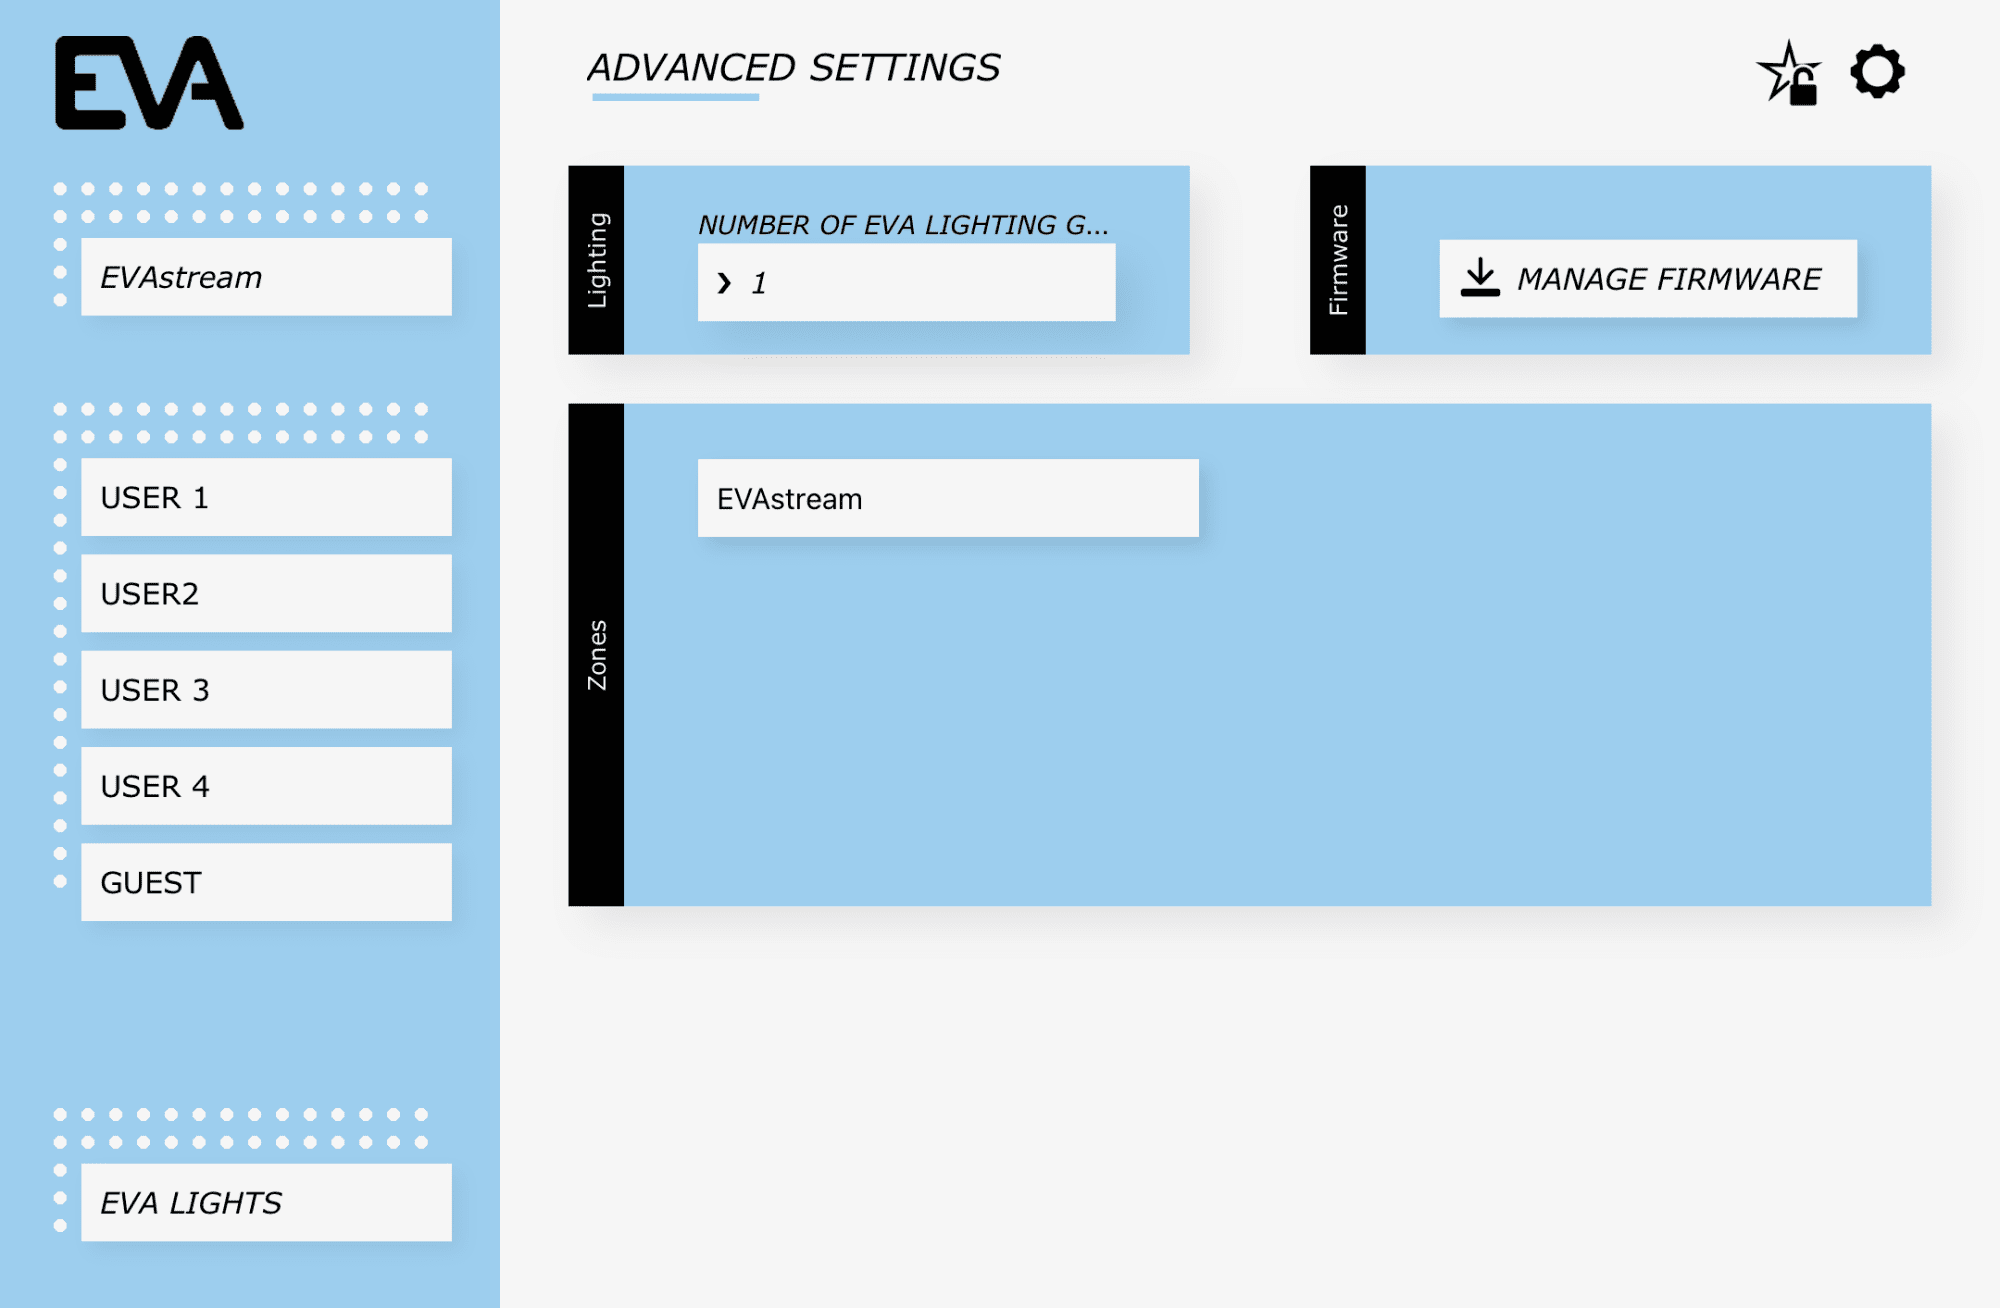
App – Erweiterte Einstellungen
Schritt 3
Tippen Sie einmal auf das Zahnrad-Symbol oben rechts, um zu den Grundeinstellungen zu gelangen.
Auf dieser Seite können Sie das Farbschema der Web-Umgebung wählen, die Sprache einstellen, eine Kindersicherung aktivieren, Benutzer anlegen und EVAstream-Trainingsprogramme den Benutzern zuweisen.
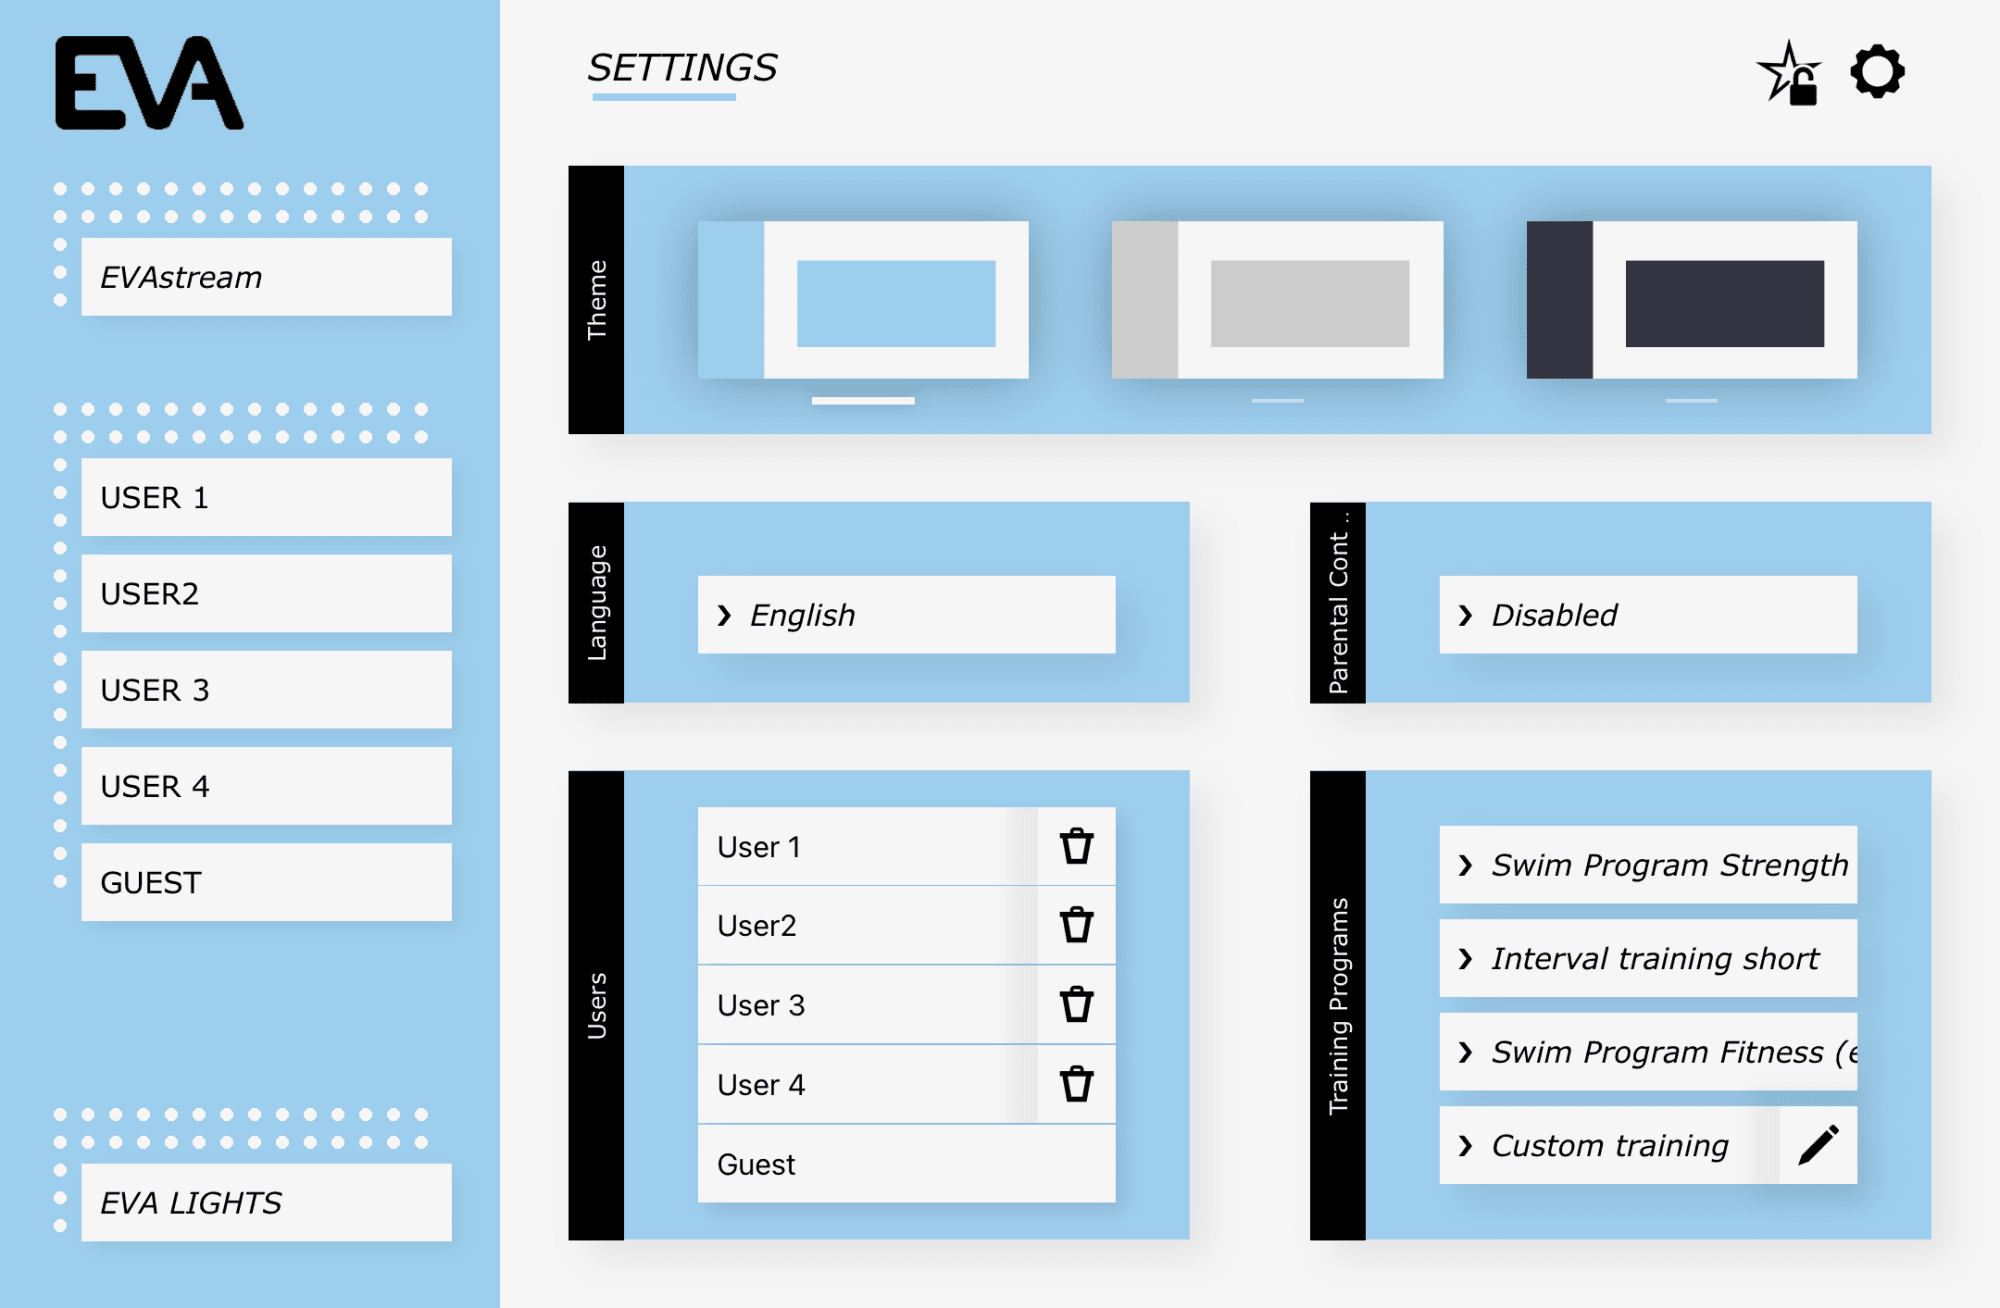
Kindersicherung einstellen
- Wählen Sie bei Parental control die Option Enabled.
- Geben Sie zuerst den Mastercode 6738 ein und anschließend einen selbst gewählten vierstelligen Code. Ab diesem Zeitpunkt können beide Codes verwendet werden (Mastercode und eigener Code). Wenn Sie Ihren eigenen Code vergessen, können Sie jederzeit mit dem Mastercode einen neuen Code festlegen.
Wenn die Kindersicherung aktiviert ist, werden Sie vor der Nutzung des EVAstream an verschiedenen Stellen zur Codeeingabe aufgefordert.
Hinweis:
Bei aktivierter Kindersicherung ist zur Bedienung des Systems ein Tablet oder Smartphone erforderlich. Die Aktivierung oder Deaktivierung über die Fernbedienung ist nicht möglich.
App – Einstellungen
Benutzer anlegen
- Wählen Sie Add New User, geben Sie den Namen des Benutzers ein und bestätigen Sie mit Enter.
- Fügen Sie dem Benutzer Trainingsprogramme hinzu, indem Sie diese im rechten Menü unter Programs auswählen.
Übersicht der verschiedenen Steuerungen
- EVA Control Eco
Ermöglicht das Ein- und Ausschalten des Stroms sowie die Einstellung der Strömungsgeschwindigkeit.
In den Einstellungen können Sprache, Kindersicherung, Firmware-Updates und die App-Farbe angepasst werden. - EVA Control 1 Essential
Bietet alle Funktionen der Eco-Version. Zusätzlich kann die EVAsubaqua gesteuert werden.
Die App ermöglicht die Bedienung mehrerer Beleuchtungsgruppen. - EVA Control 2 Trainer
Enthält alle Funktionen der Essential-Version. Zusätzlich stehen 3 Trainingsprogramme mit benutzerspezifischen Intensitätsstufen zur Verfügung.
Die Beleuchtung der EVAsubaqua ändert ihre Farbe passend zu den einzelnen Trainingsphasen. - EVA Control 3 ProTrainer
Beinhaltet alle Funktionen der EVA Control 2 Trainer.
Zusätzlich stehen 20 Trainingsprogramme sowie die Möglichkeit zur Erstellung eigener Trainingsprogramme zur Verfügung.
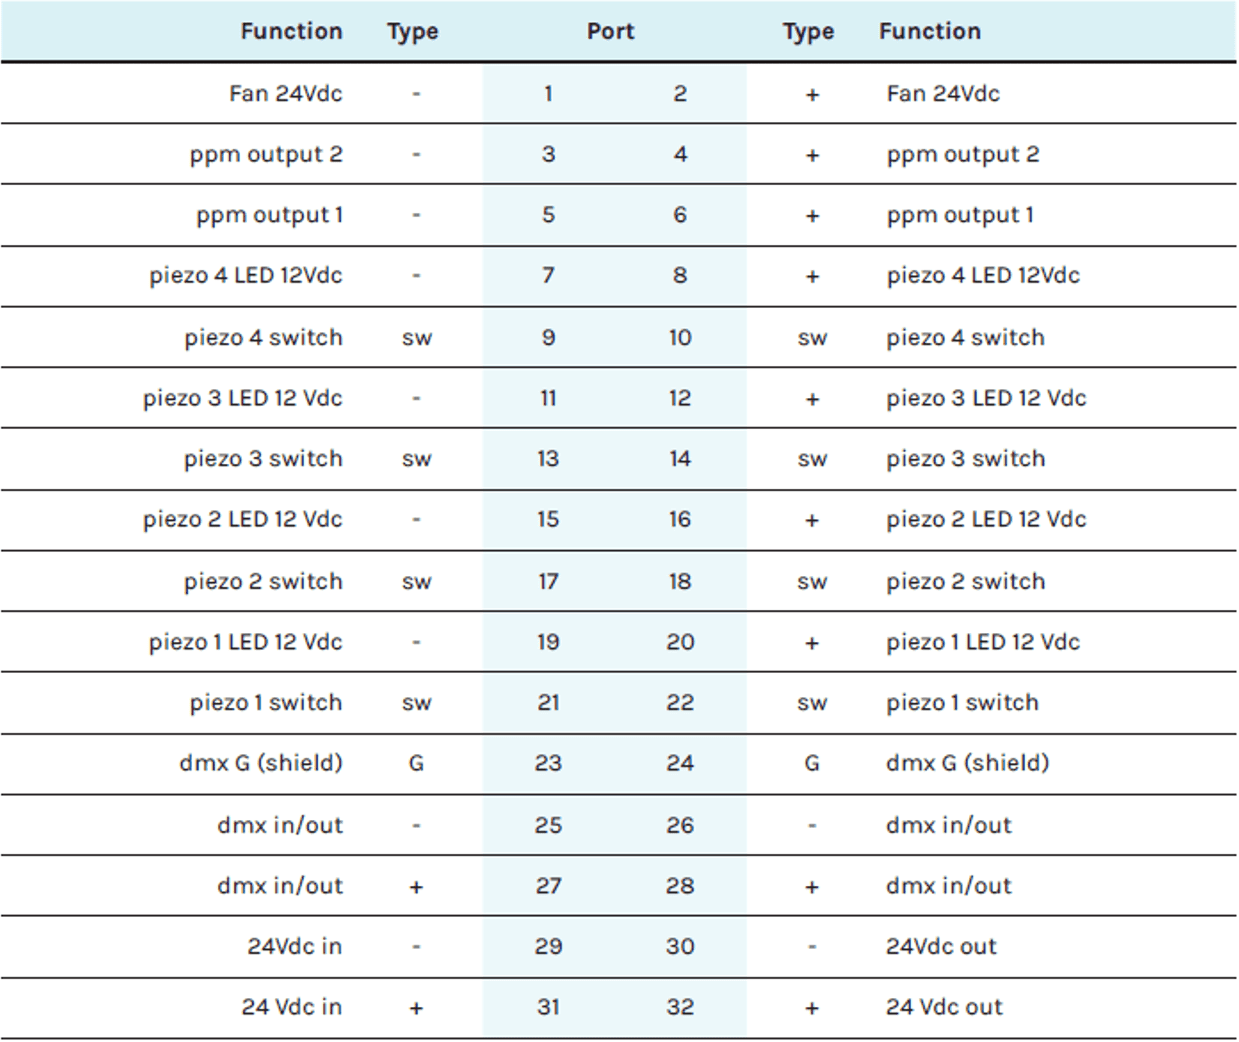
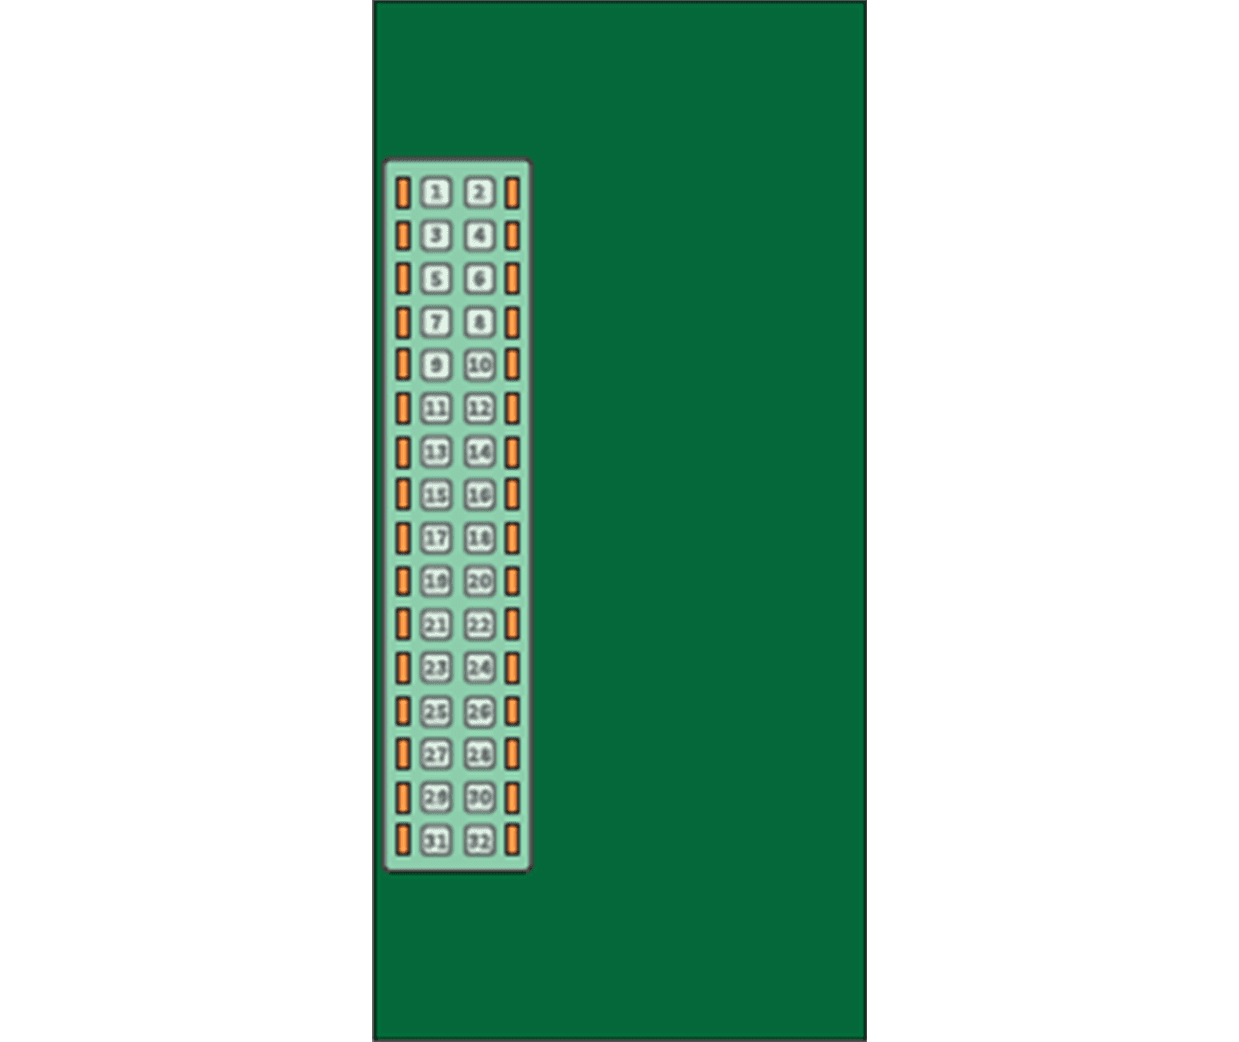
EVA-Control-Verbindungsübersicht
FAQ
Check if a VPN connection is active on your device. If it is active, disable the VPN connection or configure it to allow access to local network.
The time setting in the web application (EVAstream mode) overrides the remote controller. This means if you set the time to 30 minutes in the web app, the remote will always follow that setting and switch off after 30 minutes. To extend the operating time, either increase the time setting in the app or set the time to infinite.

The blinking green LED indicates that the software on the EVA Controller PCB is functioning correctly.
The orange LED indicates DMX activity, it lights up when the EVA Controller PCB is transmitting DMX signals (master mode, rotary switch set to 0) or receiving DMX signals (slave mode, rotary switch set to 5).
If the pop-up doesn’t appear, please check the following:
- Make sure your device is still connected to the EVA Controller (Wi-Fi connection with AP######). Devices tend to switch automatically to the strongest available network, so move closer to the EVA Controller to maintain a strong connection. The problem can also be caused by the device automatically connecting to other Wi-Fi networks. Disabling automatic connection may help prevent this issue.
- If the pop-up still doesn’t appear and the EVA Controller network is not listed among available networks, forget the Wi-Fi connection to EVAcontroller AP###### in the settings of your device. Then reconnect to this network.
- If the pop-up still does not appear, open a web browser and manually enter ‘192.168.4.1’ or ‘evacontroller.local’ in the address bar to access the setup page.
If you’re unable to connect to the EVA Controller that’s connected via Ethernet, follow the next steps:
- Check whether if the Setup Mode displays the current date and time.
- If the date and time are not shown, turn off the controller and turn it on again. Then check the date and time again in the setup mode.
- If the time still doesn’t update, the network cable may be defect.
- Remove the Ethernet cable, switch the EVA Controller to AP mode and reconnect to verify if the connection works.
If your device can’t connect to the EVA Controller via Wi-Fi, even though the controller is connected to the network via cable. Check if both the EVA Controller and your Wi-Fi network are using IP addresses within the same range. If they are not on the same IP range, they will not be able to communicate.
If your network has been extended using APs (Access Points) to increase range, this can affect the connection if these APs are set to router mode, as they may assign their own IP addresses. A wired network is usually directly connected to the ISP (Internet Service Provider) router, which also assigns its own IP addresses in DHCP mode.
If the EVA Controller page doesn’t open on your iOS device, check your firmware version. Apple’s iOS 17.4 does not support PWA (Progressive Web Apps), which are required for the page to work properly. To fix this, update your device to a newer iOS version or try to access the page on a different device.
If you’re unable to save the settings and receive an error message, it is due to the DNS Server field. By default, this field can be left empty. However, in case of an error, enter the IP address of the default gateway. If that doesn’t resolve the issue, you can also try entering ‘8.8.8.8’ as the DNS Server address.
Right now, upgrading your control is not possible. Once available, you can access this option through the settings menu (the star icon in the top right corner).
To connect to the EVA Controller via Wi-Fi, the rotary switch on the EVA Controller version 3.1 must be set to 0 in master mode. For earlier board versions starting from version version 2.0 with firmware version fw1439 or higher, the rotary switch must be set to 000. You can turn the rotary switch using a screwdriver.


